Dropper seatposts originated in 1984 and have now become a staple for avid mountain bikers. Once you invest in a dropper seatpost you’ll never look back. They will keep you safer on those downhills and keep you comfortable for the flats and climbing sections.
If you’re new to mountain biking you are probably wondering how to use your dropper seatpost when on the trails. Your seatpost will remain in the up position when you are climbing or on flat easy terrain. If you hit a technical section you simply click the lever and add pressure by temporarily sitting down on the seat to lower the seatpost into position. This makes it easier to position yourself towards the rear of the saddle to handle the downhills and difficult terrain.
How Should You Set Up Your Dropper Seatpost
Three are a few important things to think about as you set up your seatpost. If you don’t set it up properly it’ll be difficult to use it on the rides and could also cause you to get distracted. Make sure you take note of the following items when you set up your dropper seatpost.
- Your normal pedaling height when the seat is at its maximum level.
- The minimum amount of seatpost you’ll need to make sure the seatpost fits into the frame.
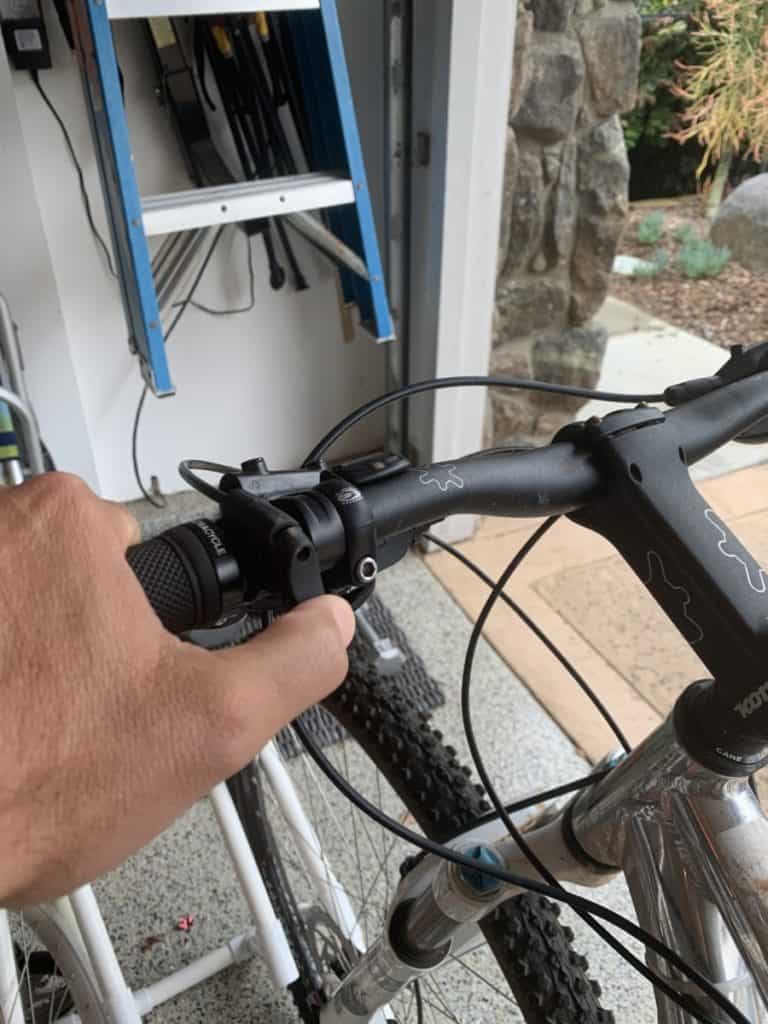
- Where you want the remote lever to placed on your mountain bike handles. You don’t want to loosen your grip or move your thumb.
Another tip for setting up your seatpost is to set up the following items in this order.
- Setup your seatpost height and make sure that the dropper seatpost is at the correct positions for you at the maximum height and minimum height.
- Make sure your brakes are set up in the position you want so that you can easily apply pressure for your personal preference.
- Lastly, install the dropper seat lever so that your thumb can quickly activate the trigger and you won’t have to adjust your hand to drop the seat.
Things happen fast on the trails especially when you’re approaching a downhill portion of the ride so making sure your set up is properly configured will keep you safe and make the experience more enjoyable.
How Do You Use Your Dropper Seatpost
Once your seatpost is set up properly it’s time to start using it. To activate your dropper seatpost you simply press the lever with your thumb this will release the seat to it’s highest point if you are not sitting on the seat.
If the seatpost is already in it’s highest position you will trigger the lever with your thumb the same way and then add your body weight to the seat until it reaches the lower height you prefer.
If you are approaching a descent you will likely want the dropper seatpost in it’s lowest position to get it fully out of the way.
Using Your Dropper Seatpost On A Descent
The dropper seatpost will give you more confidence on those downhill descents. By allowing your body weight to adjust to the back of the bike you can distribute your center of gravity in a safer position.
The alternative keeps your body weight more forward on the bike and if you are going downhill it makes you more susceptible to going over the bars.
A dropper seat definitely improves the comfort of your rides as well not only by reducing the risk of crashing but also by getting the seat out of the way. You won’t brush up against your seat as you try to move your body weight around the bike. With a rigid seatpost you’ll struggle to move freely on your mountain bike.
Tips For Keeping Your Weight Behind The Saddle
When you are approaching a downhill section drop the seat early before you get to it. You don’t want to drop it right at the lip of the hill. This could cause you to get distracted and you want to be fully set up on your bike before you get there.
Adjust your feet so that your heels are below the pedals. Your feet remain on the pedals but you are essentially pointing your toes up towards the sky to give you more control on the descent.
Lastly, shift your hips back so that your body weight is distributed towards the back of the bike. We’ve touched on this already but if your weight is on your front wheel on a descent a minor mistake a can turn into a big crash!
How To Use Your Dropper Seat On The Flat & Climbs
The main reason people use a dropper seat is for the downhill sections. That doesn’t mean you can’t or shouldn’t use it for flats or climbing. If you are riding a tricky section of technical trail you can drop that seat so that you can handle and maneuver your bike more easily. Sometimes just getting the seat out of the way is all you need to improve your riding experience.
Rocky cornering sections can be especially tough if you have to lean to one side of your bike. Sometimes just having that extra room to move around your saddle with help you get through those tough sections.
Another tip for transitioning is to anticipate the upcoming terrain. If you know the trails this is easy to do. If you are riding a trail for the first time try to keep you gaze up so that you can make adjustments to your seat and gears before you approach the change. I found this really helped me improve my speeds as I wasn’t making adjustments when I’m already on a new climb or descent. Being prepared in the right gear and at the right seat level can go a long way to improving your riding abilities.
How To Use Your Dropper Seat When Cornering
If you riding a section of trail with a lot of turns its another great opportunity to access the benefits of a dropper seat. You can easily lower your hips to the side of the bike and distribute your weight in a way to make cornering that section easy. It will lower your center of gravity and create more grip for your tires.
Advanced riders can really increase their cornering speed by using this technique. Getting your hips over the frame and digging those tires into the ground will offer you more control so that you can add the speed in a safe way. Many of the top enduro racers will utilize this technique. Many attribute improved race times with the addition of a dropper seat. The extra torque and speed you can acquire will add up over a long race.
How To Use Your Dropper Seat Over Obstacles
If you see obstacles ahead of you dropping your seat will give you an advantage on handling your bike through that section. If you seat is in a rigid position it’ll be touch to adjust your weight and make you more susceptible to a crash.
Similarly just being able to freely move around your saddle when you approach rocks, tree stumps or other trail obstacles will help you. These techniques will take time and practice but over time you’ll be able to handle tougher terrain with the help of a dropper seat.
The Origins of The Dropper Seatpost
The dropper seatpost was originally used in 1984. It how become extremely popular in recent years. Joe Breeze & Josh Angell came up with the first dropper seatpost. The tagline was “descend with conviction”. Breeze is credited with building the worlds first mountain bike.
The goal of the dropper seatpost was to allow the rider to make fast adjustments in the saddle for downhill and tricky terrain. Not surprisingly those are the same benefits current dropper seats offer riders.
The first saddle was called the “Hite-Rite” and according to an article from MB Action Breeze said “I sold a quarter-million of those before 1990.” Needless to say Breeze and Angell were pioneers in the mountain bike world and created tremendous value to all of us that enjoy mountain biking today.
The orginal Hite-Rite was a much different post than the trigger activated ones we use today. The Hite-Rite was a lever adjusted at the seat with a spring to raise and lower the seat. Current models use mechanical cable or a hydraulic hose to connect to have a lever near your thumb on the handlebars. The are raised and lowered hydraulically.
Are Dropper Seatposts Recommended For Off Road Triathlons
Personally I feel more comfortable on a mountain bike using a dropper seat. Especially in a competitive race where you’ll be pushing yourself at higher speeds. The added pressure of other riders around you will undoubtedly make your adrenaline flow and you’ll find yourself in more uncomfortable situations than you would normally.
As far as the Xterra and pro circuits most pro riders do use dropper seats in the races as well. The reality is that in an Xterra Race or Off-Road Triathlon you’ll find yourself out of your saddle a portion of the time. This is far different than a regular road triathlon where your optimal position is the arrow position in the saddle. If you are out of the saddle you’ll want that dropper seat so you can move around freely.
Dropper Seat Buyers Guide
The Top Dropper Seatpost Under $75
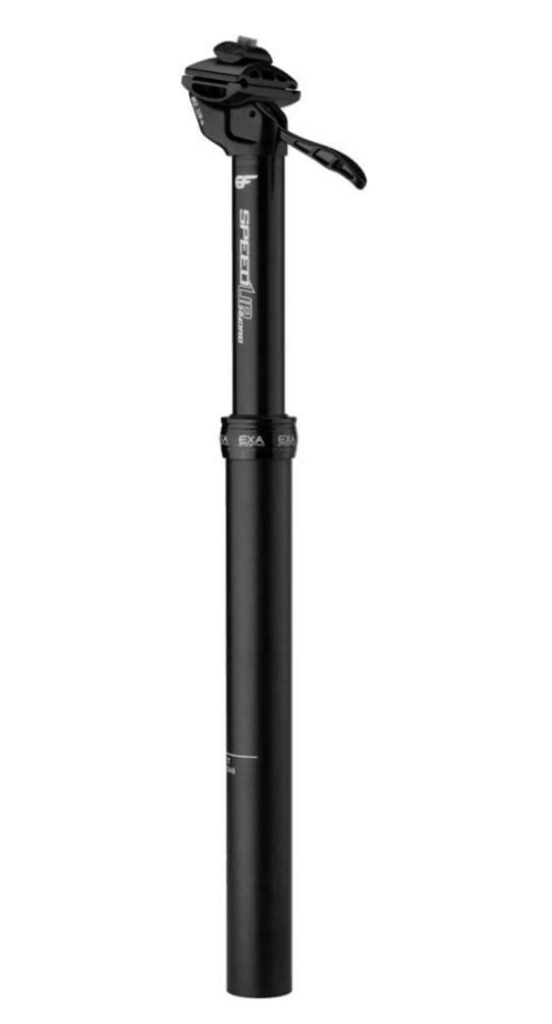
KS ExaForm Speed Up Hydro Dropper Seatpost is an economical dropper seat you can use if you are just starting out. The seat is activated at the post so you’ll be a little slower in your transitions and one hand will have to come off of the handle bars. This can be a tricky scenario if you are approaching a downhill but still riding on flat technical terrain.
This seat works good if you have long uphill and then a long downhill. In that scenario you’ll only have to switch the seat one time.
I would recommend jumping up into the next price level if possible as you will get so much more value from the extra $75. But as I said if you on a budget and just want the feel of a dropper seat this is a good choice.
Not sure how I’ve missed this until now- yes, it’s not a ‘proper’ dropper in that it doesn’t have a remote, but it’s cheap, got a decent length of drop at up to 175mm and should hopefully be easy to service. Work as a ‘spare’ dropper for when the nice one is off on a warranty claim too. Now if they’d just do a 27.2 version it would perfect for my crosser.
Swammy
The Top Dropper Seatpost Under $125
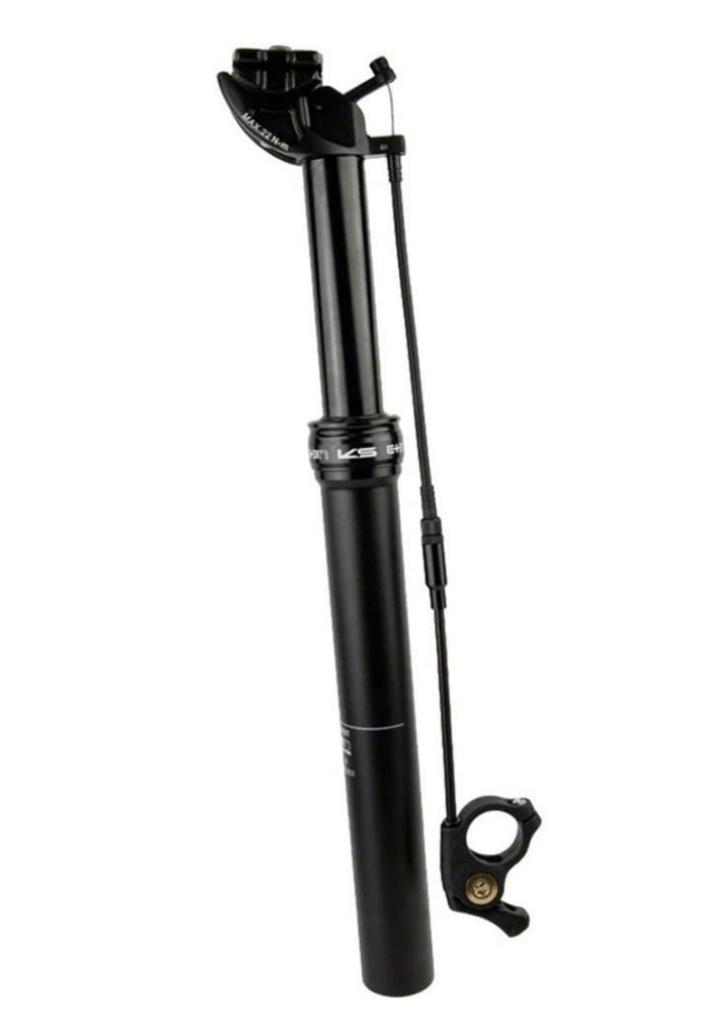
The Kind Shock Eten-Remote Dropper Seatpost is a great value for under $125. You can pick it up on Amazon right now for $109. For most riders this is a great value for the money. It’s received a ton of positive reviews. Here is a review from Jimmy F who installed it himself. It looks like you can use a simple multi-tool to complete the entire installation. As with any dropper seat be sure to get your measurements right.
Installed today. I’m 5’8″ with a 31″ inseam. On my 29er set at the proper seat height, I’m a toe-touching ballerina at a stop. Makes me creep out and I ride sketchy on technical stuff and had a couple spills at slow speeds because I couldn’t get my foot down fast enough. The dropper was the perfect answer I was looking for. And this one looks and works awesome. I don’t need a $400 Rockshock or a $600 Thompson for my needs. This is a simple install that can be done with a multitool in 20 mins. Good stuff!
Jimmy F
The Top Dropper Seatpost Under $325
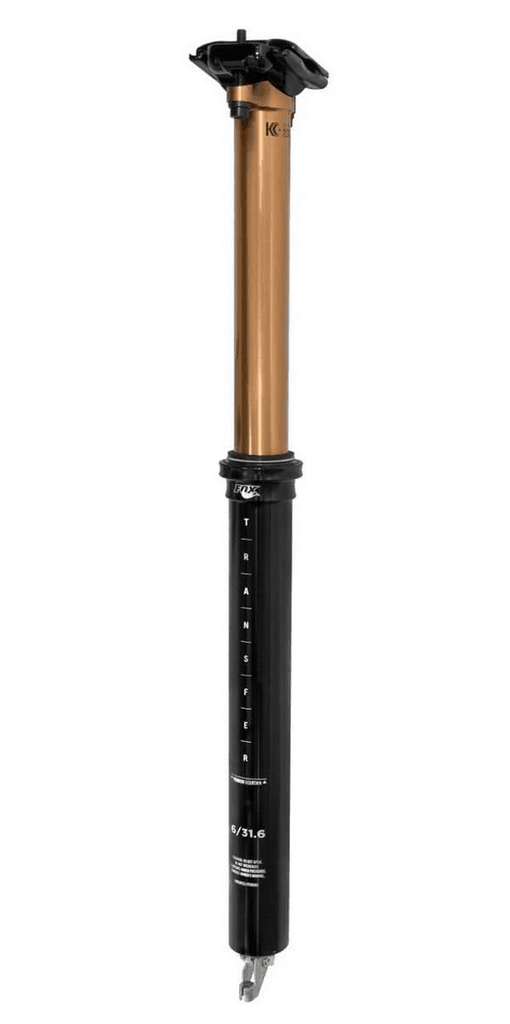
Fox Racing Shox Transfer Factory Series Dropper Seatpost With Internal Routing is one of the top dropper seats in this price range. If you are looking for a smooth transition this is the seat for you.
Fox is a solid brand that has high quality racing products in the mountain biking industry. It’s a got an eye-catching Kashima coated upper post and cable-actuated hydraulic internals. This post just looks sick! I don’t have it but I want it. LOL
Apart from the posh Kashima gold coating on the upper shaft, the Transfer Factory is identical to the Marzocchi Transfer post. We’d like to say this makes the post a smooth operator but back-to-back we couldn’t discern any difference between the two. It does look pretty though, and if you have a Fox fork on the front of you bike it’ll be co-ordinated.
Since we tested the Transfer Factory 12months ago, Fox has added an extra 175mm length and also updated the 1x remote. The old design was machined and worked okay but we had some issues with the small fixing bolts rounding out and also, we could never get it angled how we wanted. The new design is much robust and is also matchmaker compatible, which means you can bolt it directly to the brake to clean up the cockpit and eliminate the extra bar clamp.
Paul Burwell
When Is Bad Time To Use A Dropper Seatpost
You won’t need your dropper seat on most climbing sections. You can keep the seat up and just power up those hills. You’ll be in your normal riding position and if you are set up correctly you should be in an optimal riding position to add the most power to your pedaling motion.
You also won’t need your dropper seat for the flats that aren’t very technical. If you are on undulating flats with rocks and roots then you still might use it. But if it’s just simple flat areas you won’t need to lower the seat.
Should You Install Your Own Dropper Seat
If you are new to mountain biking I would leave this task to a professional. If might cost you an extra $50-$100 to get it installed by a pro but in the end your time spent trying to figure it out on your own isn’t worth it.
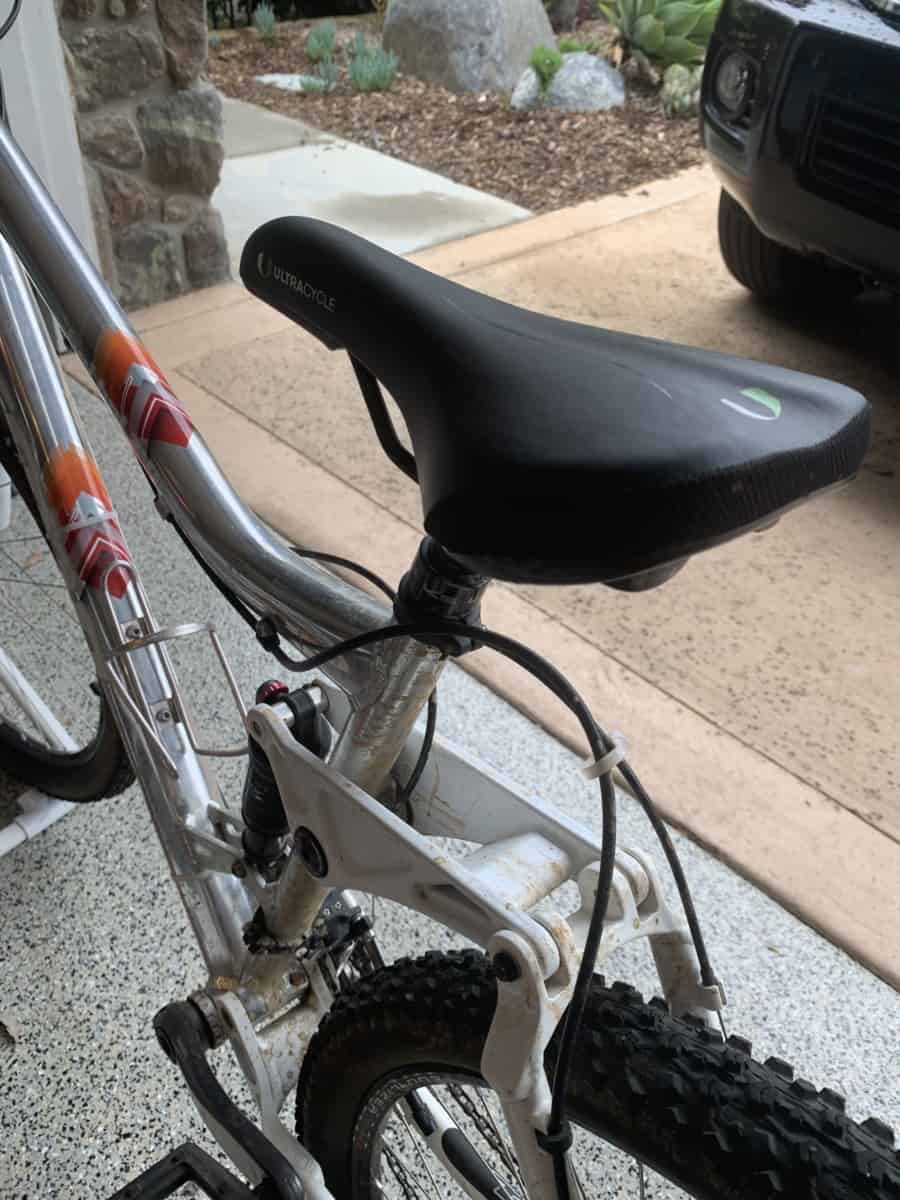
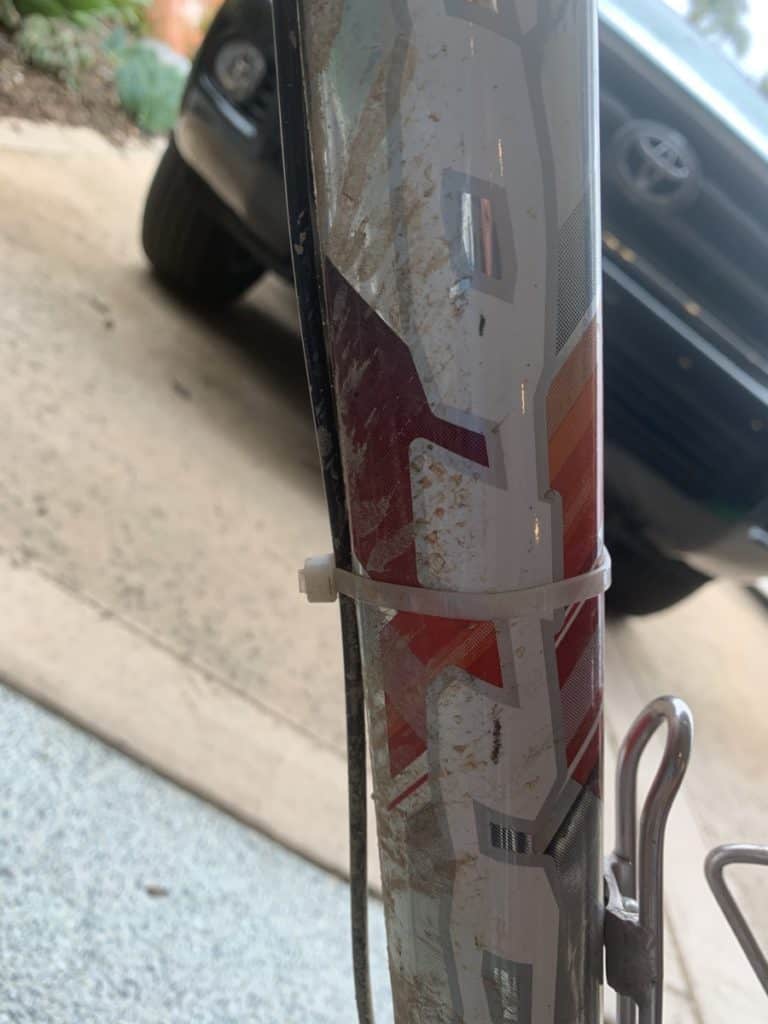
Keep in mind some bikes will allow you to add the cable through the frame while other designs will require you to have the cable outside of the frame as shown in this picture. You’re bike might not look as pretty but it will perform better with the seatpost added.
Conclusion
In the end using a dropper seatpost will make your mountain biking experience more comfortable and safer. Be sure to follow the tips above to set your dropper seatpost up properly. Having easy access to the lever is critical if you want to use the dropper seat in a safe manner. The dropper seat will help you not only on steep descents but on the flats, climbing and technical sections your rides as well. Be sure to practice using the seat before heading into steep or technical terrain. I hope you got some value from this post on how to use a dropper seatpost!