Mountain biking is a global pastime that is popular among people of all ages. It involves rigorous exercise, and is even done on a professional level. Today, we are going to discuss the mountain bike and how to adjust the handlebars, as well as why you might need to do so.
How do you raise the handlebars on a mountain bike? The method that you use to raise the handlebars on your mountain bike will depend on which type of setup your bike has.
Whether you have a Threaded or Threadless Headset Seam, the process will consist of loosening the bolts with an Allen key or a wrench, and adjusting the sizing before securing it back together.
If you are conflicted about the height or width of the handlebars on your mountain bike and are unsure where to turn for a solution, look no further. In this article, we will be going over everything you need to know about raising the handlebars on your mountain bike, all by yourself.
Why You Might Need to Adjust Your Handlebars
There are several reasons why one may choose to adjust their mountain bike handlebars. This can be anything from personal preference to comfort and the best bicycle performance.
In this section, we will specifically be going over all of the possible reasons why you might need to adjust the handlebars on your mountain bike. Take a look at the list down below to get some of the main points, and keep reading for all of the details.
Here are some of the reasons why you might need to adjust your handlebars:
- To accommodate for the growth of a child/teenager
- To regift the bike
- To improve visibility
- To ensure comfort
- To reduce the likelihood of injury
- To improve bicycle performance
The first possible reason for adjusting your handlebars might be to accommodate for the growth of a child or teenager. When choosing a mountain bike for a child or teenager, you run the risk of the sizing of the bicycle becoming obsolete within six months to a year.
To ensure that the mountain bike remains useful to the child or teenager, it is recommended that the handlebars be adjusted, or raised, once per year at minimum.
However, it should be noted that the handlebars may need to be adjusted more frequently to account for the child or teenager’s rate of growth.
Children and teenagers are not the only ones who may experience changes in stature that require an adjustment of their mountain bike handlebars. Those who are aging may experience height changes that require the lowering of their handlebars to ensure that they have a comfortable riding experience.
Another potential reason that one may have for adjusting their handlebars is to prepare the bike for regifting or recycling. Mountain bikes are versatile and when kept in good condition, they are the gift that keeps on giving.
To make sure that the bicycle is ready for the next generation or rider, all that is needed is one minor adjustment to the handlebars in order to send the new rider happily on their way.
Next, you might be adjusting your handlebars to improve visibility. While bicycling, maintaining good visibility is of the utmost importance as it helps to reduce the amount and severity of bicycling related accidents.
If your handlebars are too low, it can result in the rider being required to hunch over their handlebars to steer and operate the mountain bike.
By design, mountain bike handlebars sit slightly lower than the seat of the bike which does lead to the rider appearing to be hunched over. However, the proper position of a rider while using a mountain bike should be one that includes a comfortable grip and elbows that are not locked to the point of discomfort.
While it is one thing to be slightly lower to account for your desired center of gravity as well as the type of mountain biking you are participating in, being too low can cut off your field of vision. If your filed of vision is cut off or distorted in any way, you go from being a participant in a great activity to a liability to yourself and those around you.
Comfort is another factor that might motivate you to adjust your handlebars. Mountain biking is best enjoyed when the rider is comfortable. One way to ensure maximum comfort is to ensure that the handlebars are at a level that is most appropriate for the rider.
As stated above, mountain bikes are not designed to be ridden with the rider in an excessively hunched over position. It decreases visibility and can also have adverse effects on the rider’s body.
To avoid aches, pains, cramps, and other maladies associated with improper posture caused by ill-fitting handlebars ensure that your handlebars are adjusted regularly.
Using a mountain bike can result in injury but using a mountain bike with ill fitting, or improper handlebars almost ensures it.
Your handlebars may also need to be adjusted if they are loose, too tight, or are not the appropriate width for the rider. For those who use mountain bikes to compete in races, you cannot compete or win with a bike that you cannot control.
Adjusting your handlebars to improve the performance of your mountain bike is the final motivator for this task. At times, the handlebars may need to be adjusted for no reason other than to perform consistent maintenance to keep the mountain bike in pristine shape.
Properly adjusted handlebars will allow the rider greater control over the mountain bike. This in turn will allow for easier, safer navigation through rough off-road terrain.
Furthermore, handlebars come in a variety of sizes and some are better suited for certain types of mountain biking. If you want your mountain bike to perform well, it may be time to adjust your handlebars which could mean replacing them altogether.
How To Raise the Handlebars On a Mountain Bike
Now that we’ve covered several reasons why one might be compelled to raise the handlebars on their mountain bike, let us discuss the practical element, how to raise your handlebars.
The first step to raising your handlebars is determining what type of mountain bike you have as not all mountain bikes have the same handlebar type or set up.
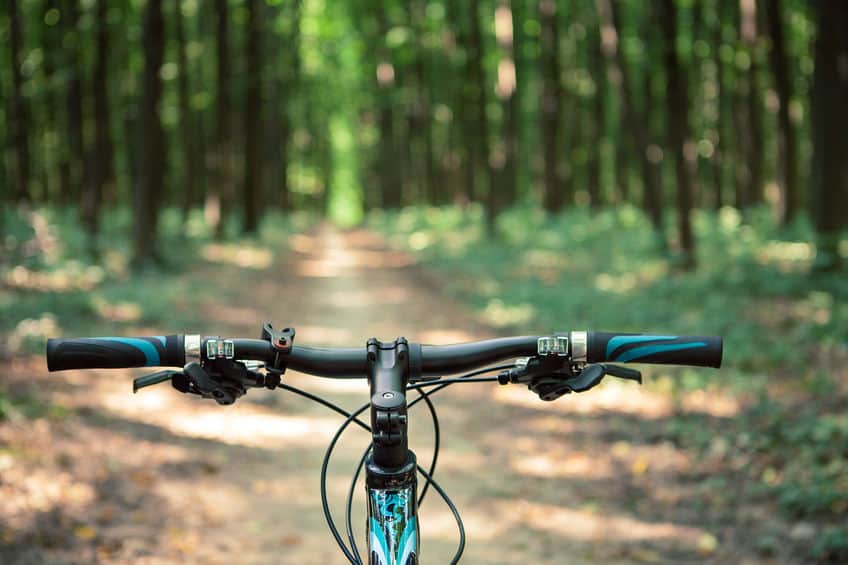
The handlebar most commonly used by mountain bikes is the Flat Bar. These handlebars are designed to be completely flat with a slight incline towards the rider.
They are most often used due to their versatility and the stability that they provide the rider. These handlebars are also known for being lightweight and compact.
Once you have determined the type of handlebar that your mountain bike has, it is time to check if the mountain bike uses a Threadless Headset Stem or a Threaded Headset Stem.
Knowing which the mountain bike uses is important as it will impact your ability to raise the bike’s handlebar.
Here is how to adjust a Mountain Bike with a Threadless Headset Stem:
- Obtain an Allen key
- Use the Allen key to remove the long bolt from the stem cap
- Set both items aside for future use (and to not lose them)
- Use the Allen key to loosen both smaller bolts on the Threadless headset seam
- Pull the handlebars completely off of the stem carefully
- Add spacers to the main tube
- Replace the stem and stem cap
- Loosen the handlebars until you can freely move them
The stem, for those who are unfamiliar with biking terminology, is the L shaped piece of metal between your handlebars and the body of your bike.
Threadless Headsets can be identified by the fact that they have a series of bolts, one large bolt and two smaller ones, that act as a clamp to keep the handlebars in place.
To make the desired adjustments to the handlebar’s height, you will need to use an Allen Key.
To raise the handlebars to the desired level, use the Allen Key to remove the long bolt from the stem cap. Make sure to set both aside for future use and to ensure that you don’t lose either piece.
As mentioned earlier, in addition to the large bolt, the Threadless Headset Stem has two smaller bolts. Take the Allen Key and loosen both of these bolts to the point that you are able to move the handlebars within the stem.
You should be able to pull the handlebars completely off of the stem. As you pull the handlebars off of the stem, be careful to not bend, break, or otherwise stress the handlebar or stem.
Undue stress and misuse may result in being unable to reattach your handlebars and stem later.
Once the handlebar has been taken off of your mountain bike, add spacers to the mountain bike’s main tube. These spacers can also be removed if you need to lower the height of the mountain bike in future adjustments. To purchase spacers, visit a local bike shop.
After the spacers have been added, carefully replace the stem back on the mountain bike. Do not stress about perfect alignment because there will be time for adjustment. Once the stem has been replaced, replace the stem cap and tighten it by hand. Do not use the Allen Key for this step.
To test that the stem cap has been replaced properly, try to turn the handlebars freely. If you are unable to do so, loosen the handlebars until you are able to freely move the handlebars in each direction.
Here is how to Adjust a Mountain Bike with a Threaded Headset Stem:
- Loosen the top bolt on the Threaded Headset Stem
- Loosen the locknut with a wrench
- Pull the stem free from the mountain bike
- Keep the correct handlebar position in mind
- Reattach the stem and adjust properly
Threaded Headsets are identified by the fact that they have one continuous piece of metal that connects the handlebars to the body of the mountain bike. These types of stems also feature a single bolt at the top of the stem.
To raise the handlebar, begin by loosening this top bolt. Following the loosening of the top bolt, loosen the locknut. This can be accomplished through the use of a wrench. Once the stem has been loosened, pull it free of the rest of the mountain bike.
When reattaching the handlebar to raise it, consider the type of bike you have. Because we are focusing on mountain bikes, it is important to note that the handlebar should be slightly lower than the seat. It should not however be so low that it adversely impacts the rider’s posture and ability to control the bike.
As stated earlier, riders should not be riding in a position that requires them to be hunched over for extended periods of time. The handlebar should be slightly lower for a better center of gravity and control while navigating the rugged, mountainous terrain.
How To Find the Perfect Handlebar Adjustment
When considering the “perfect” adjustment, another a word needs to be taken into consideration: alignment. It’s important to ensure that your handlebars are in alignment with the rest of the mountain bike.
Having out of alignment handlebars can result in injury as well as the mountain bike not being useable or road ready. The stem, whether threaded or threadless, should be aligned with the front wheel of the bike.
Checking your mountain bike’s alignment can be accomplished by standing with the frame between your legs so that it is braced and unlikely to move while the centerpiece is being adjusted.
The ideal is that the centerpiece should be aligned exactly with the front wheel. This step is very important as it relates to your ability to have proper control while turning the bike.
As you work through the steps to raise your handlebar, you may be wondering what the perfect adjustment is. Unfortunately, there is no magic preset or formula to determine the perfect adjustment.
There is no incorrect or ideal height for your mountain bike because the perfect height is based entirely on the individual. Instead of focusing on what is considered to be the perfect handlebar adjustment by others, focus on raising the handlebars to the height that your body dictates.
You may not get the height perfect on the first attempt and that’s okay. Take your time to ensure that your alignment is correct. This can be accomplished by repeating the steps outlined in the section above, “How to Raise the Handlebars on a Mountain Bike” to raise (or lower) the height of your handlebars.
As you seek your perfect adjustment, remember the following:
- Let the height of your handlebars be guided by your body, do what feels natural.
- Adjust your handlebars in a way that feels most natural and practical.
- If you don’t achieve the perfect adjustment on your first try, repeat the steps for your mountain bike stem type (Threaded Headset Stem or Threadless Headset Stem).
How Wide Should My Mountain Bike Handlebars Be?
There is no set standard for how wide your mountain bike handlebars should be. However, there are different widths that serve different purposes.
To determine how wide your mountain bike handlebars should be, you must first ask yourself what is your purpose? What type of mountain biking are you undertaking?
Mountain bikes evolved from road bikes which traditionally have narrower bars. Narrow bars are best for those who are considered with maintaining a certain level of aerodynamics. The narrower bars enable riders to move through courses at quicker speeds.
For those who are used to dirt bikes and participate in motocross type riding, a wider bar may be beneficial. Wider bars allow for greater control and maneuverability which is crucial when racing through mountainous or rugged terrains.
The width of the handlebars also requires you as the rider to factor in your personal preferences. If you are used to riding bikes with narrower bars, such as road bikes, you may prefer the familiarity of a narrower bar on your mountain bike.
Conversely, if you are used to DMX style bikes that have been manufactured to have a wider bar, you may feel out of pocket with a narrower bar, even if a narrower bar is what is traditionally used within your style of racing.
In addition to personal preference, it is also important to consider location. If you are racing in a tree filled area, a narrower bar may provide a more pleasant ride because you are not in danger of making contact with every tree you come across during your course.
Similarly, if the area where you choose to ride your mountain bike is flat, a wider bar may be suitable and even preferred.
The final factor to consider when thinking about the width of your mountain bike handlebar is the build of the rider. Body type plays as much a factor into the width of the handlebar as it does the height of the handlebar.
If you are someone with narrow shoulders or a slender build, while you may not want a super narrow handlebar, you may want to avoid the wider bars for ease of control as well as comfort.
Conversely, if you are a broad-shouldered individual, the handlebars considered narrow may in fact be too narrow to meet your needs, resulting in discomfort during the riding experience.

Always keep the following in mind when thinking about the proper width of your mountain bike’s handlebars:
- Consider the body type of the primary rider
- Decide what the primary purpose of the handlebar is going to be
- Consider what other bikes you have and if you desire to keep consistency between the bikes
- Think about where you will be riding primarily
- First and foremost, when thinking about the proper width of your mountain bike’s handlebars, you should always consider the body type of the primary rider.
Regardless of what is standard for the type of riding you prefer, if the rider is uncomfortable, the handlebar is not going to be a good fit. Comfort is key when you are riding a mountain bike, because if you are stiff in your position, you will not be able to execute the proper form and technique.
Next, decide what the primary purpose of the handlebar is going to be. If you participate in multiple styles of mountain bike riding, perhaps consider choosing a width that is a happy medium between the two styles.
Consider what other bikes you have and if you desire to keep consistency between the bikes. Some riders prefer to set all of their bikes, regardless of sport, to a certain standard because they have grown accustomed to the pros and cons of a specific handlebar width.
If you desire to keep consistency between bikes, make note of your handlebar width for future handlebar purchases.
Last but not least, the location in which you will be riding your mountain bike is important.
Think about where your riding will primarily take place and allow the location to serve as a guide for which width may be most appropriate and helpful to you during your riding experience.
With the consideration of all of the above mentioned factors, you should be able to find the perfect handlebar width to fit your needs for your next ride, and all of the rest after that.
How To Find The Perfect Sized Handlebars For Your Bike
One way to determine the best handlebar size is to consult with a local bike shop. By visiting a local bike shop and speaking with a bike expert, you are able to be matched with the best handlebars for your needs.
Factors To Consider When Finding Handlebar Size:
- Handlebar Rise
- Handlebar Sweep
Two numbers to keep in mind when looking at handlebars are the rise and the sweep, which we will be explaining in this section.
The rise can be defined as the difference between the center of the bar and the stem of the handlebar that attaches to the body of the bike.
Because mountain bikes typically employ flat bars, keep in mind that the standard rise for a mountain bike is zero. However, there are exceptions and some mountain bike handlebars have a rise of 100mm or four inches.
When choosing the rise, two determining factors are the rider’s position on the bike as well as the purpose of the bike. For taller riders, if the handlebars feel too low, a riser bar may be appropriate.
This type of bar tends to have a bit more give than your traditional straight bar which is perfect for those who use mountain bike set ups that are more gravity oriented.
These types of mountain bike bars are typically enjoyed by those who ride downhill. This is due to the fact that the riser bar will allow the rider to have better control which is great because no one wants to take an unnecessary fall.
When it comes to the handlebar sweep, on the other hand, there are two different types of measurements in this category, which you will find in the list down below.
Sweep Measurements:
- Upsweep
- Backsweep
Upsweep is the vertical angle of the bars measured from the grip. While it does not impact the rise of the bars, it is important to take note of because it directly impacts the level of comfort or discomfort a rider may encounter as they ride their bike.
Backsweep, as implied by the name, measures the angle formed by the backwards curvature of the handlebars. The backsweep can range from zero degrees (straight bars) to forty-five degrees, though this angle measure is largely reserved for specialty bars.
Now that you are aware of the different measurements that need to be considered when looking at the perfect handlebar size, let’s discuss the steps to finding that perfect addition to your mountain bike.
If you are keeping the stem of your mountain bike and are only choosing to upgrade your handlebars, that is fine. However, please note that not all clamps (the area where the handlebar is clamped on to the stem of the mountain bike) have the same diameter.
There are three diameters that are, or are becoming, standard.
The most common diameters are:
- 25.4mm
- 31.8mm
- 35mm
Keeping these figures in mind will help ensure that your handlebars are able to fit within your bike’s frame.
If you are choosing to replace both the stem and the handlebar, you have given yourself more leeway and flexibility with regards to the size of your handlebars and as such, choosing based on purpose and personal aesthetic may prove to be more useful to you in the long run.
In conclusion, mountain bikes are as versatile as the people who love them. To keep mountain bikes the favorite among many, maintenance is no herculean task.
To raise your handlebars all you need is an Allen Key, spacers, and time. In some cases, you may only need time and a wrench.
Regardless of which type of mountain bike you have, adjustments have been made simple, encouraging riders to keep their mountain bikes in pristine condition so that they may ride without concern to their hearts content.