You can’t ride your mountain bike all the time. When you want to park, your kickstand certainly comes in handy. Well, it would if your mountain bike had a kickstand. How do you go about installing one yourself?
To install a kickstand on a mountain bike, you should:
- Pick your kickstand
- Choose the positioning of the kickstand for maximum clearance
- Connect the bolt
- Tighten up the bolt with a boxend wrench
- Give the kickstand a try
As the above steps show, installing your very own kickstand on your mountain bike won’t pose a huge challenge. You can probably get the job done in about an hour if you’ve never tinkered with your bike before. Make sure you keep reading, as we’ll explain the above steps in much more detail. We’ll also include a list of several kickstands that might interest you.
Why Install a Kickstand on Your Mountain Bike?
Let’s begin with a question you might consider yourself: why do you even need a kickstand for your mountain bike?
Well, one main reason you might consider doing so is the fact that mountain bikes lack kickstands when you buy yours directly from the manufacturer. That’s unlike other types of bikes, which let you pull this piece of metal down and keep your bike upright when you’re not on it.
While some avid mountain bikers say a kickstand is unnecessary and that you can lay your bike down flat or lean it, that depends on where you’re riding. Sometimes you don’t always have a surface in which to lean your bicycle. If you just spent a lot of money on a new bike, then perhaps the idea of laying it on the dirty ground doesn’t appeal to you. We get that.
For those reasons then, you’ve decided you need a kickstand. Now it’s time to choose the right one for you.
The Best Kickstands for Mountain Biking
To install a kickstand on your mountain bike, you kind of need a kickstand. That’s why we decided to share this list of the top kickstands on the market for mountain bikes. We also included shopping links courtesy of Amazon so you can buy the kickstand that most appeals to you.
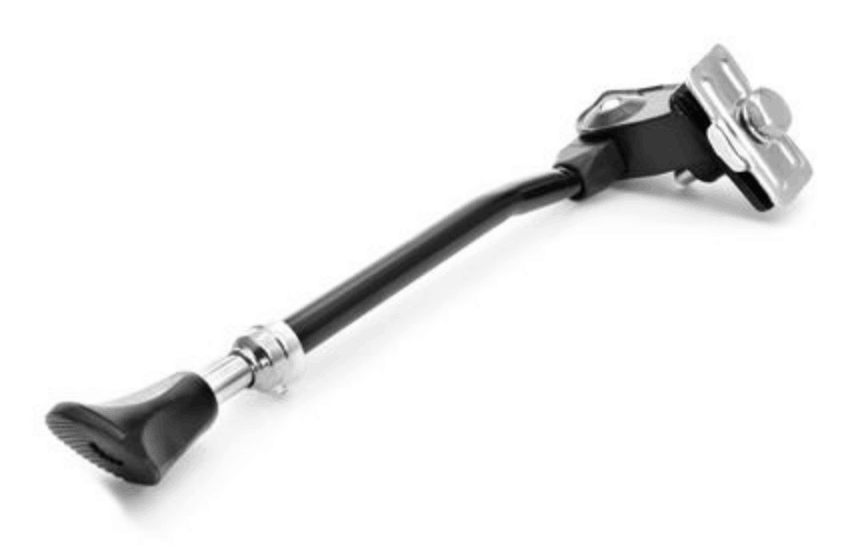
FORTOP Adjustable Aluminum Alloy Kickstand
This highly-rated pick from FORTOP has won over so many happy customers because it’s adjustable. You can shift the kickstand from a minimum length of 12.2 inches to 14.2 inches. That’s great for taller bikes or when you want to lean your bike with your kickstand at a sharper angle.
The kickstand itself has an aluminum alloy base and includes a plastic foot that promises not to slip. You can use the FORTOP kickstand on mountain bikes that are 22, 24, 26, or 28 inches and have an oval tube diameter of 15 to 28 millimeters.
Lumintrail Center Mount Double-Legged Kickstand
Another great adjustable kickstand comes from Lumintrail. Their center mount double-legged kickstand includes a non-slipping sole that also won’t dip into the mud or skitter on wet concrete or asphalt. Safer rides, here we come.
The kickstand itself is made of aluminum alloy, a preferred material that will hold up well. Your bike should have a frame size of 17 inches to 20 inches and tires that are 1.75 to 2.215 inches wide if you want to use the Lumintrail kickstand. It has a push-button latch for shifting the kickstand length as needed. You can even use that when on the go.
Sataway Adjustable Rear Mount Aluminum Alloy Stand
A favorite among serious bikers, Sataway’s rear mount kickstand could be just what you’re looking for. Made from aluminum alloy like the other picks thus far, it too has an anti-skidding, anti-slip foot. This foot is also wider so your own foot never misses it when you try to activate the kickstand.
Dual mounting points offer awesome stability where you need it most. You can install this Sataway kickstand on mountain bikes with tire sizes up to 28 inches. It’s also compatible with mountain bike frame sizes that are 24 or 26 inches.
Grealthy Aluminum Alloy Bike Kickstand
An inexpensive pick that deserves much acclaim, Greatlthy’s kickstand is touted as more adjustable, lighter, and firmer than the other kickstands you’ve used in the past. With its waterproof design, you won’t have to stress about the aluminum alloy rusting, so that’s a plus.
To install and use this kickstand, your bike should have a frame that’s 20 inches, 24 inches, 26 inches, or 27 inches.
BV Adjustable Rear Mountain Bike Kickstand
Made for MTB, BMX, road bikes, and mountain bikes, BV’s kickstand is right up your alley. It’s best on bikes with frames that are 24 to 29 inches. You can even attach it to a chain stay. The dual holes on the fixed plate won’t collide with this alloy kickstand, making installation easy. Yes, even for beginners.
How to Install a Kickstand on a Mountain Bike
After selecting one of the premium mountain bike kickstands we recommended above, the time has come for you to install it. As a first-timer who’s never done any work on your bike before, you might feel a little nervous about this installation job. While that’s understandable, you’ll soon see it’s easier than you anticipated to get a kickstand on your bike.
Here’s the steps to follow, all explained in detail.
Step #1: Choose your kickstand
You already took care of the first step in the prior section by picking a great kickstand from our list of ‘em. Order yours and wait for it to arrive.
Step #2: Check the positioning of the kickstand
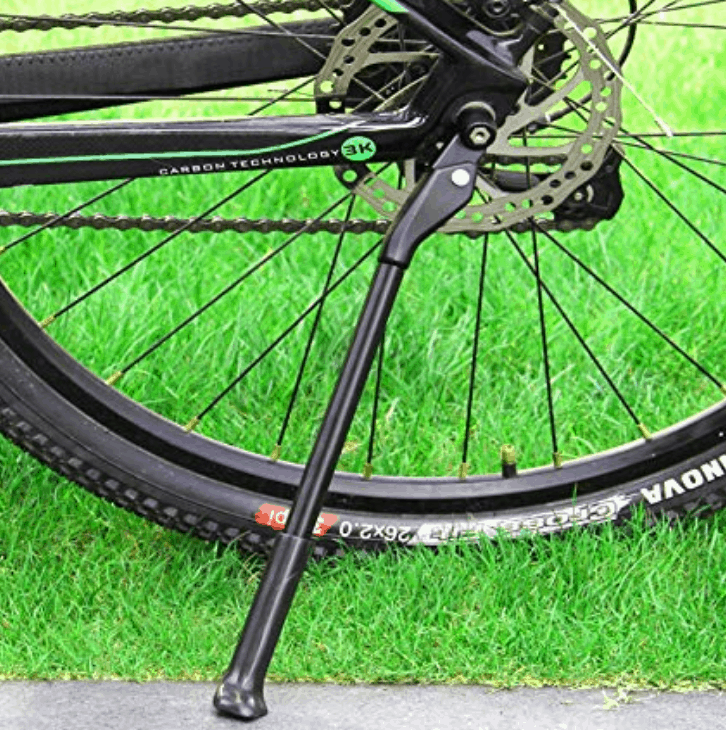
Your mountain bike doesn’t have a kickstand, as we already mentioned. Therefore, it can be kind of difficult to ascertain exactly where on your bicycle the kickstand should go. The positioning matters bigtime, so take your time with this step.
The kickstand always attaches to the frame, but you need clearance on either side. Play around with the positioning until you figure out the perfect spot for your kickstand to go. Remember, you need to put it lower on the frame so it’ll touch the ground when you put the kickstand down. That said, it should not make contact with the bike tire at any point.
Step #3: Connect the bolt to your bike
Once you’re certain you’ve got the kickstand positioned correctly, it’s time to install it to your mountain bike with bolts. First, connect your kickstand bracket. This should install near your lower frame bars, of which there’s two. The kickstand then goes under the bracket.
Make sure your kickstand bracket includes flanges. Otherwise, you risk the kickstand hitting the rear shift cable. The bracket holds it in place when not in use, which is what you want.
Step #4: Tighten the bolt all the way
With everything in place, you want to tighten all your bolts. You can start rotating it tighter with your hand. A boxend wrench that’s 14 millimeters can take care of things from there. The tighter your kickstand, the better. Remember, you’ll often use your foot to activate this safety feature, so it needs to be able to withstand some force without loosening or flying off.
Step #5: Enjoy your new kickstand
With that, you’ve successfully installed a kickstand on your mountain bike. Take ‘er out for a spin and see how the kickstand works. If you’re happy with it, then you’ve now got a convenient parking option built into your bike. If the positioning doesn’t quick work, then take the bike home, unscrew the bolt, and start over.
What to Watch out for When Installing Your Kickstand
There are two issues with your kickstand that could affect your mountain biking experience. The first of these is the kickstand accidentally deploying. Some bikers have reported that if they go out on tough terrain, that bouncing their bikes has unintentionally sprung the kickstand downward. Your kickstand suddenly staking into the ground could cause you to fall off your bike, leading to injuries. It could also severely damage your bike.
The other issue is the kickstand colliding with parts of the bike, which we discussed in the last section. For instance, the kickstand can hit the tire, rubbing against it and causing premature wear and tear.
Depending on the mountain bike brand you selected, your pedal gear shift cable and the kickstand bracket may intersect. If you can move your bracket, then do so. You want it as far away from the pedal gear shift cable as possible.
The same applies to your rear shift cable. Yes, your kickstand can get in the way here as well. Always make sure you use the included brackets for your kickstand and you should hopefully avoid this problem. If not, then reposition the kickstand and try again.
Conclusion
Mountain bikes don’t tend to include kickstands, but that doesn’t mean you can’t install your own. By following the steps we outlined in this article, you don’t have to lay your bike on the dirt when you want to park it somewhere. Make sure you install the kickstand on your mountain bike just right so it doesn’t interfere with the other parts and components. Good luck!