While there are a few cons in addition to the many advantages that come with having a mountain bike that has tubeless tires, most mountain bikers agree that having them is a definite advantage and would never consider going back to having tubed tires. But perhaps you are new to the mountain biking scene and are wondering just what all of the hype around these tires is about.
Well, simply put, mountain bikes with tubeless tires are better because they give an overall better ride with fewer flat tires, and the fact that they allow you to ride with a much lower psi than other tires has many more benefits all by itself.
But, as you might guess, there is a lot more to it than that. This kind of tire has its own history, its own way that it needs to be cared for, and a whole lot of other things that it can be important to know about it. All of these things put together are what really make a tubeless tire, and these things are also what make some people love them while others are not so enthusiastic.
The History Of Tubeless Mountain Bike Tires
In 1928 in Britain and in 1944 in South Africa were the first two recorded tubeless tires which had patents requested for them. However, both of these were soon abandoned for one reason or another and never went any further.
On May 11, 1947, the Goodrich Company in the state of Ohio announced a new invention that was the culmination of more than three years of work and research. It believed that its new tubeless tire would not only help to make automobiles much safer, but that its design was much more efficient.
This new tubeless tire eliminated the need for having an inner tube filled with air by allowing the tire itself to fill with air instead. While Goodrich was waiting for the patents needed to monopolize their new invention, they put it out literally on the roads to test it out to see if it would work the way the expected it to.
They did this in a few different ways. They installed these new tires on a fleet of taxis, put them on Ohio state police cars, and put them on some personal vehicles as well to see how these new tires performed with a variety of different users.
By the year 1952 Goodrich had won the patent rights to not only the tires themselves but also to a variety of their specific features. Within three years of this time they started becoming more standard than tubed automobile tires, with some of the advantages that it claimed to have including giving cars 25% more mileage, having fewer blowouts, and making it easier tire changes if something should happen to them.
The radial-ply tubeless tire that has different intersecting layers for more strength was invented later on in that same decade and is still what we use on cars today. It wasn’t until closer to 1999 that these tires where finally put on bikes, and mountain bikes in particular, but once they were they definitely were there to stay.
Even though tubeless mountain bikes are perhaps even more common than tubed mountain bikes in many circles, it is still something that is catching on in some of the other biking communities. Road biking in particular is taking a while and has very few options still for tubeless compatible wheels. But then again they do not deal with as many pinch flats or the same rough terrain that mountain bikers ride through, and therefore they have less of a need for the benefits that tubeless tires offer.
What Are Tubeless Tires And How Do They Work?
Tubed tires are sometimes referred to as pneumatic tires and they work by having an outer shell that protects an inner tube that is filled with air. Tubeless tires, on the other hand, do not have this tube filled with air inside them. Instead they themselves are filled with air.
This works with the help of the thicker frame and the ribs that are built into tubeless tires. These ribs help to keep the tire in place as it is filled with air, forcing it to stay up against the frame of the rim. The fuller the tire gets with air, therefore, the more firmly it is pushed against the rim of the wheel.
This creates an airtight seal which is then made even stronger of a bond by the use of sealants that act like a sort of glue. The valve of tubeless tires usually rests directly on the rim, making it a little easier to start inflating the tire while holding it in place.
Pros And Cons Of Tubeless Tires On Your Mountain Bike
Perhaps the main advantages of having tubeless tires on your mountain bike are actually the disadvantages of having tubed tires. Tubeless tires do not have the many disadvantages that tubed tires have, so knowing what these are can sometimes help you better see why tubeless tires are superior.
The tube of a tubed tire of any kind can fail for any number of reasons. Some of these simpler reasons can be due to an incorrect tire fit, a puncture, a pinch flat, and even sometimes there can be some unexplained friction between the tube and the inner wall of the tire around it. This friction can either eventually wear a hole through the tube or, if it generates enough heat, it can even melt through it.

If a tubeless tire gets a small puncture somewhere in it, the only place that the air will be leaking out will be the place where the hole is at. The bigger the hole is the faster the air will leak out, but unless it is a gaping rip or something then most of the time this is a fairly gentle deflation that gives you plenty of warning before all the air is out.
Tubed tires, on the other hand have more of a tendency to burst all of a sudden like a balloon that is popped. While this does not happen too often, and partially depends on the state of the outer part of the tire, when this kind of blowout does happen it can lead to the temporary loss of control on when steering your bike.
More often tubed tires get what are most commonly called pinch flats. This happens when the tube inside the tire gets literally pinched by most often hitting a small rock or something else a little too hard. When this happens it creates a hole in the tube from which the air very suddenly and noticeably starts to leak out. Tubeless tires do not have this inner tube to get pinched flats, and therefore this is one of the main benefits to having them.
Part of the reason why a tubed tire gets a pinch flat is due to the higher air pressure – more commonly referred to as psi – which tubed tires have to have. Having a tubeless tire with a lower psi has a number of other advantages. First of all, the lower pressure means that the tire is not technically as fully as inflated as it could be.
This means that when you hit a bump or something that you will not feel it as much due to the fact that your tire will be able to absorb some of the impact by simply pushing the air around a little in the tire. When a tubed tire hits a bump, the tube inside it is already stretched to its fullest and therefore has no extra space to absorb any of the impact, instead bouncing you up for a moment.
A second reason why it is extremely helpful to have less air pressure and therefore nice to have a tubeless tire is the better grip this gives on the ground. The lower the psi that you can ride with, the slightly flatter the bottom part of your tire can get as your weight pushes down on it. Having the very bottom of your tire be flat helps it to really grip the ground, thereby giving you much more control especially when making turns.
Another good reason why it is better to have a tubeless mountain bike is the slightly less weight that tubeless tires have compared to tires that have to have both an outer part and a tube on the inside. While this loss in weight is counterbalanced a little by the sealant that must be placed inside a tubeless tire, every little bit of weight that you can cut off of your mountain bike will help you go that much faster and for longer rides before you get worn out.
Finally, the last of the main benefits that I will mention is how well tubeless tires deal with punctures. While you might not think they could handle a puncture at all, they actually do much better due to the sealant that is inside them. On a tubeless tire when you get a puncture the air will start to leak out of that spot, but in so doing it will also push the sealant into the hole.
This does a great job of quickly sealing up any small hole that you might get, sometimes without you even noticing that you got them, and all without you even having to stop or get off of your bike. For larger holes this may not work so well, but things like plug kits are easy to use and can last a surprisingly long time if they are done correctly.
There are only really two main downsides to going with tubeless tires. This first downside is that these can sometimes cost you money to by a wheel that is compatible with them. But more and more often wheels are being made to be compatible anyway, so this is not always needed.
The second and more important of the two reasons is twofold in that it can be a quite a bit more challenging to install, this being in part because you have to deal with sealant. You have to get the bead of the tire to stay right where it is supposed to be while you are also trying to pump air into it and also with some sealant inside it to seal it up when you are through.
Needless to say, this can take a bit of a knack to get right if you are new to this procedure and is not something that you could easily do on the trail. For this reason it is still advisable to take a spare tube with you on long mountain biking trips. However, if you have had any pinch flats due to having a tubed tire, then you likely are already carrying one of these spares around anyway.
How To Care For Tubeless Mountain Bikes
Besides the normal care that any tire should have, such as being cleaned off if it gets caked with a thick layer of mud during a ride for example, there are a couple more things that go into the maintenance of a tubeless tire. The most important one of these is the fact that it needs to have more sealant added to it ever so often.
If you are going over a lot of small thorns on your rides then this might need to be every few months because this will be using up the sealant inside. But if you are not really going over a lot of that sort of terrain then you can often add a little more sealant into your tubeless tires closer to every six months.
However, if your mountain bike has been sitting somewhere without being ridden for a few months then you may need to take the tire off and clean out the sealant. This is because sealant that just sits in your tire without being moved around by you riding your bike will end up pooling in the bottom of the tire and hardening there. This then will need to be cleaned out and replaced with new sealant before you go on your next ride.
The second part of maintenance is keeping up with your psi levels. This must be done more often than with a tubed tire due to the fact that the tire is the only thing that is holding the air in, but it is pretty easy to do. This should be done every few weeks, depending on how often you are riding your bike, and with an air pump handy to add in a little more air if you need it.
How To Pick The Right Tubeless Tire For Your Mountain Bike
The first part of switching over to having tubeless tires is of course figuring out what size you need to get your new tire. One of the simplest ways to find this out if you don’t already know the right size to get is to look at the tires you currently have on your bike.
On the sides of most mountain bike tires you will usually see a set of numbers that usually looks something like 27.5×2.0 and what this tells you is that this tire has a 27.5” diameter and it is 2” wide. Therefore you know that this is the size you should get for your tubeless tires. As a general rule almost all mountain bikes fit in the 1.9”-2.5” wide range with the 2.5” wide tires being mostly for downhill racing and things of that nature.
Once you have figured out what size of tire you need to get, the next step is to try to pick the right type of tread that you want on it. There are basically four different kinds of tread that you can choose from, each one designed for a specific purpose.
Slick tires appear almost smooth with barely any grooves in the tread at all. This kind is better for riding on smooth trails since it offers little if any grip. Semi-slick tires are ones that are smooth in the middle and heavily grooved on the sides. This design helps there to be no resistance when you are going fast yet it gives you good grip when you are turning.
The last two kinds are inverted tread tires and knobby tires. These have different variations, especially when it comes to the size of the knobs on the knobby tires, but both offer the most grip for tires and are great options for mountain biking.
Finally, there are also sometimes differences between tires that are specifically made for front wheels with other tires being sometimes specifically made for back wheels. While these can be used for either one, front tires tend to wear more on the sides due to turning, while rear wheels wear the most on the center of the tread. Tires that are made specifically for one or the other take this into consideration.
How To Switch To Tubeless Tires On Your Mountain Bike
There are a number of different kinds of wheels on mountain bikes, but these can for the most part be divided into three categories when it comes to tubeless tires. These three divisions are: wheels that are made specifically for tubeless tires, wheels that are made to be compatible with tubeless tires, and wheels that are not made for tubeless tires.
Out of these different wheels, the kind that is specifically made for tubeless tires will of course be the easiest to install them on. However, even wheels that are not made with tubeless tires in mind can still be used, you simply have to buy and use a converter kit on them to get them ready for the tubeless tire first.
Most of the time it is still better to have the right kind of wheel, however, since these work better with the tubeless tires than wheels that have to be converted and have a few less potential problems. These problems can be due to the tape not working correctly or the bead of the tire not sealing as well even with plenty of sealant to help it.
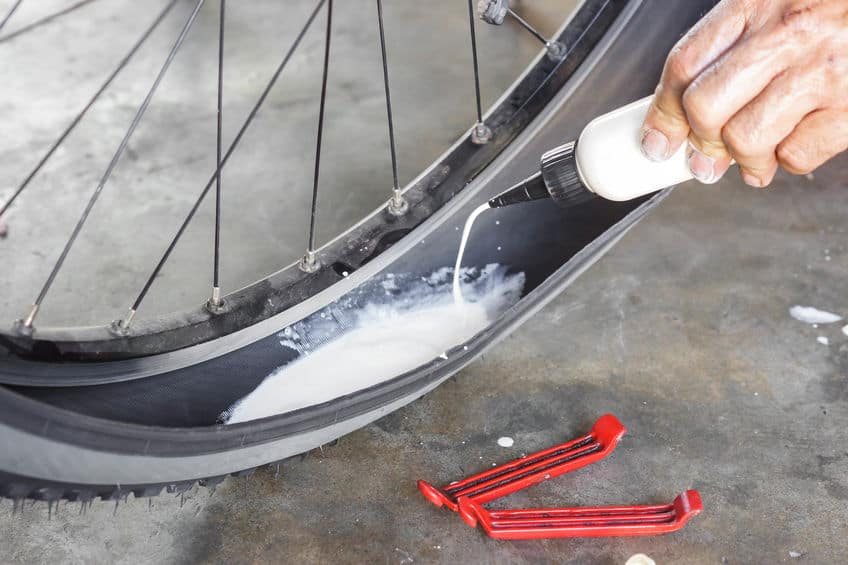
In order to make the switch you must first have a few things besides your new tire and your wheel that is either compatible or has been prepared to go with it. The first of these things is a liquid sealant that is for tubeless tires, most of these say somewhere on the back what amount you need to put in when installing a tire, so you may need something small that you can measure the right amount into as well.
If you have a tubeless inflator, these work the best since they air up the tire quickly so that it hopefully does not have time to slip out of place. You will also need a lever, or something that can be used as a lever, in order to get the old tire off and sometimes as help to get the bead of the tubeless tire into the correct position onto the rim of the wheel. However, you want to treat the bead of tubeless tires with special care and not get too rough with them since any damage to the bead can prevent it from getting the airtight seal that tubeless tires have to have.
The first step when making the switch is to take off your old tubed tire. If you are careful enough when you are doing this you can even keep the tube inside and use it as a spare tube in case you get a flat. Next, you will also want to take out the rim tape if there is any there, since this will not help with the air tight seal.
If you have to convert your wheel using a converter kit, now is the time that you do this. It can be helpful to make sure that you wheel is both clean and dry before you start so that everything has the best chances of working properly.
Now you can get your new tubeless tire on you wheel and pour the sealant in according to how much you are supposed to put there. Then comes the tricky part of getting it inflated. When the bead of the tire settles into the correct spot on the rim you most often will hear a popping sound and this will let you know that it is on right.
Once you are done installing your tire, the final step is to spin it around a bit and double check that the bead is on right. Doing this also helps the sealant to coat the inside of your tire completely which will in turn help make sure that it seals your tire in place. Lastly, you should also set your psi to the right spot. You should check the air pressure again after the first long ride that you do since some air can “burp” out of the tire as it more firmly seals into place.
How To Fix A Leak In A Tubeless Mountain Bike Tire
For dealing with a hole in a tubeless tire you have three main options. The first option, if the hole is really big or there is more than one hole, is to of course simply replace it. However, this is always the last resort and you will usually go with one of the other two methods first.
The second method is using a patch. Tire patches come in a wide variety of kinds but they all tend to work the same way. These are rather time consuming and difficult to apply since in order to use them you first have to take your tire off of the wheel of the bike. Once the tire is off, you then find the place on the inside where the hole is and clean the area a bit if possible.
Then you apply the patch that acts like something between a band aid and a piece of extra-sticky tape. After applying this patch you often have to wait a few minutes or so to allow it to really dry on and then you put your tire back onto your wheel and air it back up, often applying a little more sealant if you have it handy and twirling your wheel around, before going on your way again.
The third method for dealing with a hole in your tubeless tire is called a plug kit. This is much easier to use than a patch kit and works by literally pushing a sticky, rubbery plug into the hole to seal it. This uses a special tool to push the plug into the whole, with the excess being cut off when the hole is plugged up. Sometimes these need to dry in place for a few minutes, but then you can simply replace the air that you lost and can continue your ride.