If you have been looking into getting a bike, then you have no doubt noticed that there are a number of differences between each kind of bike. Mountain bikes, for instance, have much wider handles than the other kinds of bikes out there. If you own a different kind of bike you may be wondering why mountain bikes have these wider handles and if you really need them.
The purpose of mountain bikes having wider handlebars is to give better balance over steep terrain and to give better control when making sharp turns over loose soil. That is because both steep terrain and loose soil are common things you encounter when mountain biking, making this feature especially important. However, if you do not intend on doing any rough mountain riding or over difficult terrain then you might very well be able to do without this feature.
Be that as it may, there is actually a lot more than you might think to the wider handlebars of a mountain bike. Not only are there different widths, but there are ways to choose the right width for you, ways that you can cut your mountain bike handlebars if they are too wide, and more that you should know.
The 3 Main Benefits Of Having Wide Handlebars
Stability is definitely one of the main benefits of having wider handlebars. When you are riding on a trail over loose rocks, gravel, snow, mud, or anything else that tends to move some as you go over it, it is vital to be able to stay as steady on your mountain bike as you possibly can. This is just as important when going over technical trails since you have to have both control and stability to be able to succeed at doing them.
A wider handlebar is also better for stability in that the width is good at helping to absorb any impacts on the front wheel. This, in turn, also makes for a slightly smoother ride and you don’t have to spend as much energy in keeping your bike steady meaning that your rides can last longer before you start to feel worn out.

A wider, more stable handlebar is really important when making turns, which is the second of the main benefits of having wider handlebars on a mountain bike. The wider handlebars give you more leverage to help you fight the momentum that is propelling you straight forward. This extra leverage makes it not only easier to hold your handlebars in the position to turn without them wobbling as much, but lets you make extra sharp turns with a good amount of control.
Lastly, the third one of the main benefits to having wider handlebars is that of comfort. As mentioned wider handlebars make for a smoother ride. Having a wider grip on the handles can also often feel like a much more natural position. This shifts some of your weight forward onto your handlebars instead of almost all of your weight being on your seat, which makes you sit more balanced on your bike.
What Are The Different Handlebar Widths?
Handlebars can either be measured in inches or millimeters, but they are more commonly measure in millimeters. The most common handlebar width is either 750ml or 760ml which is 29.9”and this can be a great place to start if you are unsure what width is the one you need.
Most new mountain bikes come with the 760ml size so if you don’t know what size the handlebar on your mountain bike is then it is most likely this size. However, mountain bike handlebars can come in a wide range of sizes that are as narrow as 600ml or as wide as 840ml, or even more. A normal range tends to be somewhere in the 700ml to 800ml range which is 27.5” to 31.5” and nearly everyone will be comfortable in this range.
How To Pick The Right Handlebar Width For You
While there are a number of different guidelines that you can use to help you, the most important thing that you should consider is your own comfort. Even if everyone you meet and everything that you read tells you to go with one specific handlebar width, if you find that width to be uncomfortable for you after trying it then don’t go with it.
However, it is rather unlikely that all of the different ways that you can use to determine your optimal handlebar width will all exactly agree. This being the case, these are still very useful in giving you a range of widths that you can feel sure that you fit in as a good place to start.
1.
The first guideline is the most simple. As a general rule you can measure your shoulders and add 4”-5” to this measurement to get the right number of inches for the width of your handlebars. Using this method, the wider your shoulders are then the wider your handlebars will be, and this makes perfect sense.
However, sometimes you can be more comfortable with a wider or narrower width regardless of their shoulder width. This is why you should also try the second guideline.
2.
The second guideline has two methods and it is based on figuring out what width is already comfortable for you. You can easily use either one or both of these simple methods and you only need a wall, a floor, and something to measure with.
For the first method you start by standing a few feet away from a wall while facing the wall. Then you should let yourself fall forward. As you fall put your hands up with your flat palms towards the wall at the last minute to catch yourself. Keep your hands on the wall where you put them and have a friend measure the distance from the outside of one hand to the outside of the other, or you can remember where you put them and measure the distance yourself.
For the second method you have to first get on the ground to do a pushup with a tape measuring tool handy. Move your hands around until they are in the most comfortable spot for doing a pushup and then measure the distance from the outside of one hand to the outside of the other or have someone else do this for you.

In either case the measurement that you get should be exactly the width that you are most comfortable holding your arms apart and therefore the size width of the handlebars that you should get. The reason why this method is a good one for figuring out the width that your handlebars should be is that while riding down the trail you will be doing a lot of pushing, pulling, and twisting of your handles. Therefore, you should have your hands a comfortable distance apart to do these things.
3.
Another simple guideline for determining the right width is the angle of your elbows. Ideally when you are in your “attack the trail” position on your mountain bike with your upper body tilted slightly more forward than usual your elbows should be at almost a 90 degree angle. The upper part of your arms should still have a slight downward slope and should make your elbows at least a few inches lower than your shoulders.
4.
The next guideline for determining the right width for your handlebar is deciding what type of mountain biking you will be doing more of. If you are planning on doing a lot of downhill riding in particular, then you will need your handlebars to be as wide as possible to help you with your stability and to give you more control.
On the other hand, if the trails that you will be going on will be flatter and smoother, then you might not need your handlebars to be as wide. This is also true if you plan on doing cross country racing or participating in ad sort of speed competitions, since narrower handlebars are more aerodynamic and will help you be a little bit faster.
5.
The fifth, and last, guideline for choosing the right width for your handlebars is taking into consideration your height and the length of your arms. While it is true that the width of your shoulders plays a larger part, as a general rule having a taller body and longer arms also tends to need a wider handlebar regardless of the width of your shoulders.
In some cases this is not exactly straightforward however, especially in cases where a person is tall with shorter arms or is short with longer arms. There are also differences between men and women in this regard as well. This is why, while it is something to definitely keep in mind, this is by no means a definite way of determining the right width of handlebars for your mountain bike.
Signs That Your Handlebars Are Too Wide Or Too Narrow
While you can no doubt see that having wide handlebars can be a huge advantage when you are out on the trail, you should be careful not to go too far with this. An obvious sign that your handlebars are not the right width for you can be shoulder pain. This can be with or without an improper “shrugging” position, which is where you look like you are perpetually shrugging your shoulders when you are riding your mountain bike.
Handlebars that are too far apart place your head too far forward. If you were to crash into something while in this position you will be far more likely to bash some part of your head into your handlebars before you can catch yourself with your hands. This wouldn’t be a pleasant experience for obvious reasons.
Having handlebars that are too wide will also make you feel sluggish and it will take you longer to turn since you will have to turn the handlebars more than it is comfortable for you to do. This also means that it will take you longer to make turns. Another consequence, especially on narrow trails, can be that one side or the other of the handlebar gets caught by passing foliage or even crashes in to the trunk of a tree that is near the trail.
If your hands are so far apart that it makes your elbows be pulled out an angle that is greater than 90 degrees, then this can also be a clear sign that your handlebars are way too wide for you. While you are shooting for close to 90 degrees when you are leaning forward, you do not want your elbows to be anywhere near the same height as the your shoulders, which should in turn be lower than your ears.
On the other hand, if there is much less of a 90 degree angle then you should consider getting wider handlebars. If your hands are the same distance or less apart than your shoulders are there is no doubt that your handlebar is too narrow.
Having handlebars that are too narrow will not only give you less of the control and stability, but they can even give your lungs less space for you to breathe. This is due to your arms being too close to your body and can result in making you find it harder to take a really deep breath. If you notice that it is hard to take a deep breath, or that doing so pushes your arms further out as your ribs expand, then this is a clear indicator that your handlebars on your mountain bike are too narrow for you.
How To Cut Your Handlebars Down In Size
If your mountain bike handlebars are already too narrow there is unfortunately nothing that you can do to make them bigger. In this case your only option is to buy a wider handlebar. On the other hand, if your mountain bike handlebars are too wide there are ways that you can cut them to make them the right size to fit you properly.
Cutting a handlebar yourself is fairly straightforward process. This process depends some on the material that they are made of, but varies very little from type to type. Cutting your handlebars on your mountain bike is much better for you than riding with handlebars that are too wide since it can be actually uncomfortable even if you try to force yourself to grip them at the right spot.
While by far the simplest way to do this is to take your bike to a shop and to ask them to cut your handlebars for you, it is also quite possible to do this yourself. Anytime you cut your bars you should always cut them exactly the same on both sides and do so in increments so that you do not cut off too much.
A fine-toothed hacksaw is the most common tool for cutting mountain bike handlebars, though this does tend to fray carbon fiber handlebars much more than you might want it to. A plumbing pipe cutter can also do the job as well as long as it is a well-made one that is decently hardened steel.
Overall, a saw or blade with metal teeth will tend to do better on steel, aluminum, and titanium handlebars with carbon compatible blades being much better for carbon handlebars. Should you not have any carbon compatible blades, try to choose a blade that has as high of a teeth-count as you can get.
When using a pipe cutter you will need to watch out for the marks that it might leave. Whichever option you plan on using to cut with you will also need a file, some 150 grit sandpaper, or something else to smooth the edges when you are done cutting the ends off of the handlebar and that will take care of any frayed edges that result from cutting.
If you have carbon fiber handlebars you should also definitely wear a face mask, since any dust that you make while cutting these is something that would be very bad for you to inhale. Another helpful thing to do to limit the amount of dust that gets into the air is to wet the handlebar before you start cutting and to keep a spray bottle of water handy to keep it moist as you are cutting it.
The first step in cutting your handlebars is to set your mountain bike somewhere where the handlebars will stay as stable as possible. The next step is for you to remove the grips, levers, and anything else that is on either of the ends of the handlebar.
If you wish to keep these then you can set them aside until you are ready to put them back on again at the end. You might also need to loosen the controls and move them in and out of the way if you feel like you might need the space to work with and to avoid accidentally damaging them.
Next you should know by now how much you are cutting off of your mountain bike handlebar. Take the total amount you want to remove and then divide that number by two so that you know how much you are cutting off of each side. Then you can measure from the end of your bars and mark that amount with a permanent marker or anything else that you have handy to mark with.
Some handlebars will even come marked for you to cut. These will have lines and numbers on them so that you don’t have to measure anything thereby saving you a couple of steps if you know the width that you want them to end up being.
If you want to do so, you can put masking tape or some other similar tape over the spot you will be cutting and mark the cut line on top of that. Cutting through the tape will often help cut down on the fraying and can sometimes catch a little of the dust. When you are done with your cut, the tape is easily removed.
To make sure that you are cutting perfectly straight through the bar and do not deviate, use two lock-on collars of any kind you wish. Attach these to the same side and give yourself just enough space in between them so that whatever you are using to cut the handlebars can fit in the space. Something like a hose-clamp will also work for this and can be fairly cheap and easy to find. When you are done cutting one side you can simply take them off and move them to the other side.
When you are cutting your handlebar, use long slow strokes instead of trying to quickly saw back and forth. Ease up on the pressure some when you come to the last few strokes and remember that the teeth of your cutting tool should be doing most of the work for you so you should not need to push hard at any point.
When you are done cutting all the way through the bar you should sand the edges down a little so that you can rub your fingers over the ends without getting cut. This will make it safer to install the grips back on without getting yourself cut and will help prevent the grips themselves from getting damaged as you put them on.
The last thing for you to do is to install your grips, levers, and anything else that was there, whether it is the old ones you just took off or new ones that you want to trade up to, and re-adjust your controls if you moved them at all before you started.
Alternately you should at least consider taking your handlebars entirely off of your mountain bike before cutting them. By doing this you will be able to get them in a much more stable position to cut them. This will also help make sure that any dust particles that you make – especially if you are dealing with carbon handles – do not end up falling and working their way into any of the joints of your mountain bike.
If dust particles from cutting the handles do end up in the joints or important places of your bike it could prove to be a problem. You may need to not only wash your bike afterwards, but also re-oil any places where the dust got in since this can stiffen these up.
Since there is nothing that you can do to fix it if you cut your handlebars too much, it is always better to cut off just a little at a time. While this can seem tedious, you do not want to have to buy another mountain bike handlebar just because you got impatient and cut too much.
After cutting your handlebars to be narrower, you should ride with them several times like that before you decide if you need to cut more. This will give you a really good chance to get the feel for them and to make an unbiased decision on if they need more off of them.
You will also likely need to adjust the length of your stem anytime you make any changes to the width of your bars. This is because changing the width will affect how far you are leaning forward. A good rule of thumb is to raise your handlebars 10ml for every 20ml of handlebar that you cut off, or to do the opposite and raise the handlebars on your mountain bike if you are going with a longer handlebar.
Other Handlebar Considerations That You Should Think Of
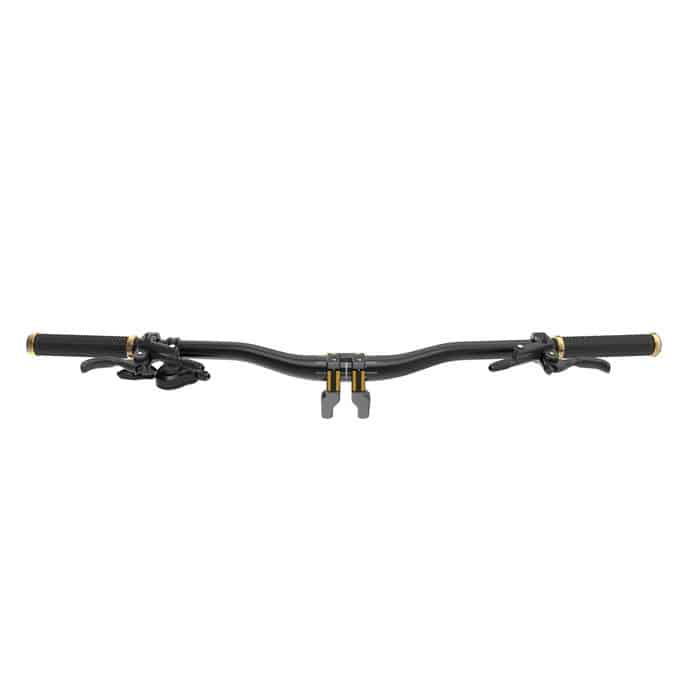
There are a few other important things to a handlebar besides its width. The rise of the bar is the term that is used to describe how much the bar raises up from the middle, while the sweep of the bar is the term that is used to describe how much the bar curves back towards you.
If a handlebar is too straight it will cause your wrists to bend in and your elbows to poke out. This position can be very uncomfortable and it is bad for your wrists. The proper sweep and rise will let you use some of your back muscles as well as the muscles in your arms and this will help relieve some of the strain off of your arms.
However, some people find that flat bars are more comfortable for them and appreciate their simple design. So, again, while this is more about what make you personally comfortable it is also something that needs to be considered.
Another more common handlebar consideration is the size of the stem, but the diameter of the handlebars themselves is also something that it is important to think about as you determine what mountain bike handlebars are right for you. Finally there are all kinds of designs that handlebars can come in.

