As a mountain biker, you put your bicycle through a lot. It endures more rigors of the road than a commuter bike would. You’re thinking of giving your mountain bike a tune-up, but admittedly, you’re not sure if it’s time yet. How often should you tune your mountain bike?
How often you tune your mountain bike does depend on use, but you must give the bike a tune-up once annually at the very least. For heavy-duty mountain bikers, you should do it twice a year, sometimes even more.
In this article, we will tell you everything you need to know about tuning your mountain bike. From step-by-step directions to costs and more, you’ll walk away feeling very confident about how and when to tune a mountain bike.
What Is Bike Tuning?
First, just to make sure we’re on the same page here, let’s talk about what it means to tune a mountain bike or any bike, really.
You’ve probably heard of tune-ups in relation to car ownership, right? When you take your car in for a tune-up, you’re maintaining it to ensure its continued functioning into the future. A bike tune-up is essentially the same thing.
You’re not fixing anything, so don’t think something must be wrong with your bike to necessitate a tune-up. Instead, you’re trying to prevent something from going wrong so you don’t have to pay for repairs later. Above all, you keep your bike in running condition so you don’t have to stop using it unless you want to.
What’s Included in a Bike Tune-up?
You may now wonder which services constitute a mountain bike tune-up. Well, honestly, it varies. Depending on where you go, the services included in a bike tune-up can and do vary. That said, it’s important not to skip over certain services, as this might not keep your bike in the best shape.
Here’s a list of which services you should make sure your bike undergoes as part of a tune-up.
Brake Check
You need your mountain bike brakes to come to a soft or sudden stop anytime you want them to, so they’re one of the most integral parts of your bicycle.
During this part of the tune-up, your bike mechanic will realign and readjust the brakes and gear. They’ll also make some adjustments to the brake arm positioning and the cable tension as well. This will improve your mountain bike’s front and rear brakes. Now, when you use these, the front one will feel soft and the rear one stiff. This keeps you on your bike when you come to a stop, lessening your risk of flying off.
Your bike mechanic will also move your bike’s brakes until they’re closer to the rims. They’ll finish up this part of the tune-up by checking the brake pads, housing, and cables, changing these out if they’re very worn down.
Tire Pressure Test
While you should manage the pressure of your mountain bike’s tires yourself periodically, this service will also be included in most bike tune-ups. If the tire pressure is too low, the mechanic will fill the tire(s) until it’s just right. They’ll also release some air if needed so the pressure isn’t too high.
Bottom Bracket and Headset Adjustments
The bottom bracket of your mountain bike includes the area from the crank arms to the shell. It has bearings that you will inevitably wear down. Regular bike use can cause some quick wear and tear to the bottom bracket, so mountain biking accelerates this by quite a lot. Luckily, by adjusting the tension, it’s possible to get more time out of your bottom brackets. Your bike mechanic can take care of this job.
There’s also the bike’s headset. You’ll find this around your bike’s fork and the handlebar. Again, the bearings here can wear down fast, so they need a replacement and a tension adjustment as well.
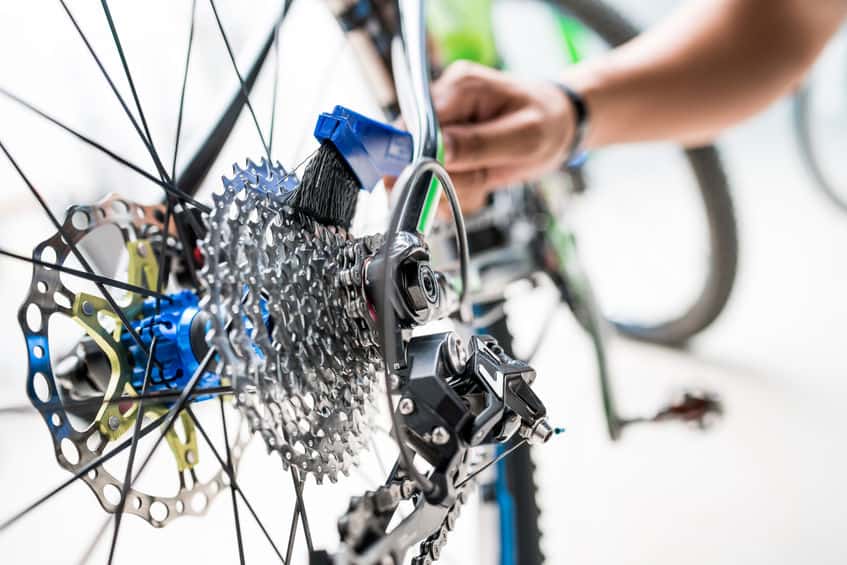
Wheel Check and Tuning
We already talked about tire pressure, but a wheel check is different. Here, your bike mechanic will do something known as wheel dishing. With this, they check the axle and then realign the wheel so it matches the axle. They’ll also fix the wheel bearing external tension, readjusting this.
Before moving on from the wheels, the mechanic will tune them. They do this through a process called truing the wheels, in which they create spoke tension to keep the rims as straight as possible.
Lubrication
If parts of the mountain bike such as the derailleurs and drivetrain need lubrication, this also counts towards your bike tune-up.
Drivetrain Part Replacement
Mountain bikers often report their drivetrain starts to go because the parts break down. Specifically, it’s the bike’s chain that often suffers the most damage. This can become weathered to the point where the mechanic will have no choice but to change it. Otherwise, you could have rear cassette wear.
Derailleur Adjustment
The derailleur gears of your mountain bike let you adjust speed. If one of these gears isn’t working, you may be stuck riding at a speed that makes you uncomfortable. The derailleur includes a mechanism, sprockets, and a chain. The mechanism can take the chain and move its positioning from sprocket to sprocket.
During your mountain bike tune-up, your mechanic will certainly adjust the derailleur. This will ensure you can shift gears when you need to without difficulty. Next, they’ll check that the limit screws are set. This way, the chain can’t get dislodged from the sprockets. Also, they’ll redo the derailleur’s cable tension.
Cleaning
All parts of your mountain bike will undergo a thorough cleaning before the bike is returned to you.
Safety Check
A safety check involves testing for loose or worn parts, guaranteeing the security of external accessories and attachments, and double-checking tire pressure.
Test Drive
Still, the best bike mechanics will hop on the bike personally to see if anything feels amiss. If it does, they’ll take the bike back and make the necessary improvements. Another bike mechanic may get involved at this point to give the mountain bike another cursory check.
How Often Should You Tune Your Mountain Bike?
You now know a lot more about mountain bike tune-ups. You can understand then why the timeframe for how often you should get a tune-up varies. As we said in the intro, the amount of use your bike gets will influence how often it needs a tune-up. The trail types you choose also matter. Softer terrain will wear down on the bicycle components less than harder ones.
Of course, you’re a mountain biker, so you’re going to do some heavy-duty riding. Therefore, although some riders can get away with tuning their bikes once a year, we wouldn’t advise you to do the same. Instead, you want to make it a point to do a tune-up at least twice a year, maybe more.
Should You Tune Your Mountain Bike Yourself or Let the Professionals Do It?
Two sections ago, we dove deep into all that encompasses a mountain bike tune-up. Throughout that section, we talked about a bike mechanic going through all the stages and processes of maintenance. Do you have to go to a trusted professional for this job or can you take care of your mountain bike tune-up yourself?
Either works, but it certainly depends on your personal preferences. Your experience will also come into play. If you’re not yet familiar with the various parts and components of your mountain bike, you should learn them for reasons outside of tuning up your bike. After all, the more comfortable and familiar you are with your bike and how it works, the easier you can identify a potential issue that arises. Then you can get it fixed or even take care of it yourself.
If you want, you can try a half and half method. With this, you take care of only the most basic maintenance work yourself. Then you’d take your mountain bike to a professional technician or mechanic to do the rest.
What kind of work might you do? You’ll want to shift the sprockets for one. This will keep your chain from skipping gears or coming loose. You’d want to put your bike in a repair stand and then select the tiniest sprocket to begin with, working your way up. You’ll also need a barrel adjustor, which you’d use on the rear derailleur.
You might also do a brake adjustment. Again, make sure you have a barrel adjustor for this one. Use it on the brake caliper, moving click by click until you adjust the brakes into place. You might also need a pad or cable replacement, but your bike mechanic would have to take care of this.
You can lubricate your bike as well, specifically your chain, when needed. You can find chain cleaner at any bike shop, or you can look online. Some cleaners use solvent, but this can be dangerous. Always read the ingredients list carefully!
Now, the biggest perk of tuning up your mountain bike yourself is saving money, since you don’t need to pay for a pro. That said, you’d only reap that benefit if do you comprehensive maintenance yourself. The above steps do not a full tune-up routine make, so you’d still have to pay for something.
Also, bike tune-ups tend to be more inexpensive than you perhaps thought. We’ll talk more about tune-up costs a little later in this article. While prices do vary, it won’t break the bank to let a pro take care of a tune-up. You also save time this way.
How to Tune Your Mountain Bike Step by Step
We do just want to caution you that you should only consider doing a mountain bike tune-up on your own if you’re confident you can handle it. A lack of experience is nothing to be ashamed of, but it can cause more harm than good. You could break parts without meaning to and then have to spend even more money to get them fixed.
If you’re insistent on doing a mountain bike tune-up yourself, make sure you have the following gear, tools, and equipment:
- Bike repair stand
- Barrel adjustor
- Cable ends and ferrules
- Shift and brake housing and cables
- Waterproof grease
- Metal file
- Shock pump
- Derailleur alignment gauge
- Hacksaw (it could come in handy for chopping down metal at the handlebars, seat posts, and steerer tubes)
- Air compressor
If you’re working on the wheels, you’ll need:
- Dish tool for your mountain bike’s wheel hub center
- Spoke tension gauge and spoke wrench
- Cone wrenches that are 13 through 17 millimeters
- Truing stand for adjusting bike wheels
When maintaining your mountain bike’s drivetrain, make sure you have:
- Pedal wrench
- Bottom bracket tool
- Crank arm puller
- Adjustable wrench, one that’s at least 12 inches
- Chain whip
- Cassette lockring remover
- Chain wear indicator gauge
- Chain pliers and chain pin removal tool
- Cable cutters
- Needle-nose pliers
- Torx wrench set, especially a T25
- Allen wrench set, from two to 12 millimeters
- Screwdrivers, including Philips and flatheads
For your brakes, gather up these tools and items:
- Brake cleaner, such as denatured alcohol
- Rags
- Torx T25 wrench
- Truing tool
- Bleed kit with oil
- Needle-nose pliers
- Open-end wrenches between six and 12 millimeters
- Allen wrench set between two and five millimeters
Last but not least, for all general maintenance, keep the following on hand:
- Floor pump
- Tube patch kit
- Spare tubes
- Tire levers
- Rags
- Chain cleaner and lube
- Chain brush
- Open end wrenches between six and 17 millimeters
- Allen wrench set between two and 12 millimeters
With all that out of the way, let’s go step by step and explain ways to tune up various parts of your mountain bike.
Lubricating Your Mountain Bike
By moistening the parts of your mountain bike with lube, you keep them from drying out and rubbing against each other. Metal on metal is not pleasant, and certain components can break if strained enough like this.
You might want to use oil-based lubricant for the job, especially with the drivetrain and the chain. Not only does your lubricant keep the parts greased up, but they also get less of a coat of grime and dirt on them. That keeps them working their best.
Here’s how to lubricate your mountain bike’s parts.
Step #1: Open your bottle or tube of lubricant. You can apply the lube directly on the bike part or put it on a clean cloth and then rub it in. A little can go a long way, so don’t be wasteful!
Step #2: Cover the chain in lubricant. Make sure you don’t miss any parts.
Step #3: While you’re doing this, make sure you turn the pedals as well. They should move counterclockwise. Go slow with this part.
Step #4: Continue with the lubrication, focusing on exposed cable wires, the brake lever pivot points, and any other parts of the derailleur that move.
Step #5: If your mountain bike parts have excess lube, then use a dry rag to clean them. You may notice lube accumulation around the chain especially.
Inspecting the Bike’s Bolt Torque
Your bolt torque is another major part of your mountain bike. Time can cause it to loosen, so you might want to check on it every few months even if you’re not giving your bike a tune-up.
Do the following.
Step #1: Locate the bike’s bolts.
Step #2: Test for looseness.
Step #3: If you find any loose bolts, tighten them back up with a torque wrench. Make sure the stem bolts stay especially tight.
Testing Bike Cables
Another tune-up task you can handle yourself is working on your mountain bike’s cables. These cables are a series of wires in a plastic base. They attach your bike’s handlebar shifters and travel to your brake pads and derailleur. If the cables get worn down or snap, that would be majorly detrimental.
Prevent that from happening with these tune-up steps.
Step #1: Find your cables on your mountain bike.
Step #2: Check each one. You’re looking for such issues as cable looseness as well as dirt buildup, rusting, crimps, or cracks.
Step #3: If you find any of the above, you’ll have to go to your bike shop and get the cables changed out for new ones. While it’s possible to change the cables yourself, you should have a lot of experience in mountain bike cables before attempting such a task.
Testing Tires
Your mountain bike tires and wheels aren’t the same. The wheels, also known as the rims, are what the tires fit over. As the tires connect with the ground, they create friction which acts as traction for you to have a smooth ride. Indeed, without tires, you’d feel the shock of every impact your bike makes with the ground.
Here’s how to keep them their best.
Step #1: Give your tires the once-over. You want to keep your eyes peeled for tears, cracks, and splits. Make sure you look at the tire from all angles, including the sides. If you don’t see any damage, then great. You should also check for excessive wear and tear or one tire side compared to the others.
Step #2: Decide just how damaged the tire is. If yours seems worn down, then riding on it further puts it at risk of exploding. You could crash if such an event occurs. It’s much smarter to replace the tire.
Checking the Drivetrain
The rear wheel cassette, derailleur, chainring, chain, and pedals all comprise your mountain bike’s drivetrain. You want to pay extra special attention to this part of your bike, then.
Step #1: Grab your bike stand and set it into place.
Step #2: Position your bike so the rear tire is up. Now, give it a spin, adjusting the gears as you do so.
Step #3: Look at the cassette, derailleur, chainrings, and the chain itself when you’re done. If these have scrapes, dents, teeth missing, and a lot of wear and tear, you might want to get the parts replaced through your bike shop.
Step #4: Consider getting new chains as well. The smaller your chainring, the less time you typically have with it before it risks breaking. For each 2,000 miles you accumulate on your mountain bike, you should get all chains in the drivetrain replaced. Some riders push it to 3,000 miles, but we don’t advise you to anymore than that. It could cost as little as $20 and as much as $50 for a chain replacement in the drivetrain.
Maintaining Wheels
We talked about the tires, so of course we want to mention the wheels or rims as well. While tires cushion the wheels and allow for a more comfortable ride, the wheels also lend comfort to your ride. They help with your stability as well.
Here’s what you can do for your wheels as part of your mountain bike tune-up.
Step #1: Use rubbing alcohol as a cleaner for your wheels.
Step #2: With your dry cloth, wipe off any excess alcohol on the rims.
Step #3: Now that your wheels have been cleaned, check them out with fresh eyes. Do you see damage such as dents, scrapes, nicks, or scratches? If these aren’t too severe, you probably don’t have to worry, at least not yet.
Step #4: Lift your mountain bike, preferably using a bike stand to assist you. Then, turn your bike’s wheel. Does it wobble? It shouldn’t and if it does, it may need a replacement by a bike mechanic.
Step #5: Do the same for all the second wheel. Again, get it checked if you’re concerned.
Managing the Brake System
You also have to do work on your brake system as part of your mountain bike tune-up. You can’t go without brakes, so if yours are even a little worse for wear, you don’t want to mess around. Not only do you put yourself at risk of injury, but any other people you might come near when barreling down the road on your bike, too.
Step #1: You want to begin with your brake pads. They’re made of rubber and look rectangular in shape. They should hit the rim of your bike tire, but make sure they’re in place anyway.
Step #2: While spending time on your brake pads, determine if one side or the whole pad itself has worn down faster than the others. This shows you it’s time for a brake adjustment. You can either do this yourself or let a pro bike mechanic take care of it.
Step #3: If your bike pads are especially old or worn, get new ones.
Step #4: Go to your handlebars and press down on the brake lever. What do the brake pads do? Do they connect with the rim with each squeeze you do on the lever? If so, then you’re in good shape.
Step #5: If not, then tighten your mountain bike’s brake arm tension screw.
Step #6: To keep your cable tight when you use your bike’s brakes, use your barrel adjuster on the brake lever.
How Much Does a Mountain Bike Tune-up Cost?
Perhaps after reading the above section, you decided it’d be smarter to send your mountain bike to a mechanic or technician to take care of the tune-up. Exactly how much money will you spend per maintenance trip?
According to 2017 data from Groupon, a standard tune-up may cost you between $65 and $75. As we’ve talked about several times in this article already, those prices aren’t set in stone. Depending on where you go and the services offered, you might spend less money and sometimes even more. Also, know you can always find a deal on tune-ups if you search hard enough.
Conclusion
Mountain biker owners should get into the habit of tuning their bikes at least twice annually if not more. Since the frequency of tune-ups is based on the terrain you ride and how much wear and tear you put on your bike, make sure you do maintenance accordingly.
You can either reach out to your local bike shop for a tune-up or even take care of this job yourself. While it doesn’t matter so much who does it, what’s more important is that the tune-up is done right. This way, you can feel assured that your bike is ready to go no matter where the road takes you. Good luck!