The lumens – how bright a light is – that you want for a mountain bike light will depend mostly on what you will be using the light for and the environment that you will be riding in. For example, if you are going to be riding in an area that is already partially or mostly lit you will need far less lumens than you would need if you will be riding through a dense forest that has no light provided whatsoever.
So, how many Lumens Is Good For A Mountain Bike Light? If you plan on mountain biking in the dark it is generally recommended that you have 500 lumens on your bike and 500 lumens on your helmet. This will be enough light to guide you through dark foliage covered areas.
Another thing that you have to take into consideration is how good or poor your own personal night vision is. For example, if you can see really well at night without light then you will need less lumens than you will need if you are someone who usually needs a lot of light to see well or if you know you are partially or mostly night-bind.
If you are a beginner mountain biker with very little trail experience you should always go for more light instead of less. Speeding down a trail will also require more light since you will catch up to the area that is lit up faster and will therefore need a brighter light that carries further down the trail.
If you are using your mountain bike for getting to and from a night shift at work or just riding around on streets at night, you could probably get away with as little as 100 lumens on your bar-mounted light. This is because streets tend to be already lit and your main goal here will be to be seen more than you will actually need help with seeing.
However, if the streets are poorly lit you will need more than this to actually help you see, since 100 lumens doesn’t help light your path much at all. If you choose to go with a brighter light for riding on streets keep in mind that you do not want it to be too bright so that it blinds the drivers that might be coming in your direction. Your rear light can be even less than 100 lumens, but not too much lower since you do want it to be seen.
For regular off-road riding a light that is around 750 lumens is the least that it is advisable to have. This would be for wide open areas where you might have some natural light like the moon and where your light wouldn’t have too many obstacles that would limit its range. Still, remember that the faster you plan on riding the trail the further the range of light you will need to have to see where you are going and that will require more lumens.
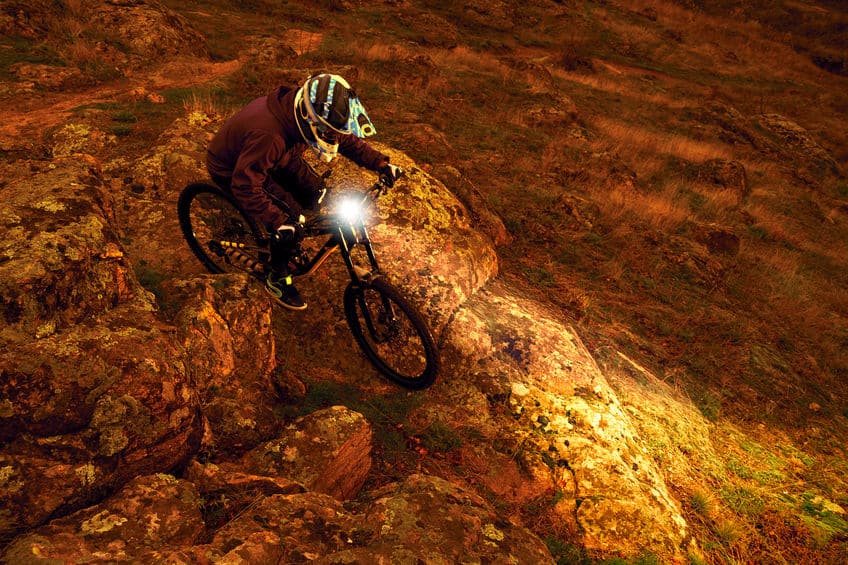
Anything that is like thick forest, especially if you intend on going fast, will require closer to 3,000 lumens in order to avoid accidents. It is far better to have too many lumens than to not have enough when night riding on a mountain bike trail. Though you might not need a rear light on the trail, it can still be helpful if you are riding with a group of other people to have a low lumen red light on the back of your bike.
With all this in mind having somewhere around 800 lumens on your helmet light is ideal and around 2,000 lumens for your bar-mounted light is usually quite sufficient, especially if you are just getting started with night riding on mountain biking trails.
How To Read Lumens On Mountain Bike Lights And Measure Them Yourself
While most people are aware that lumens is a way of measuring light and that the higher the light says that its lumens are the brighter it is, this can get pretty confusing when it comes to mountain bike lights. This is because some lights will have two different numbers for the amount of lumens it gives.
Usually one of those numbers is the claimed lumens – or the number of lumens that the makers claim that their light gives, based on the theoretical measurement which that number and quality of LEDs should give. The claimed lumens is essentially what the light should give if it operated at 100% efficiency but, since this rarely if ever actually happens, it is usually better to go with the other number which is the measured lumens.
If you need to there are ways of measuring the lumen output yourself so that you know exactly the lumen you are getting for a particular light. The results you get won’t be as accurate as you would get in professionally done lab test, but if you combine a couple of them and average the result you can usually get a pretty accurate estimation.
The simplest way to measure lumens is by purchasing a lux meter, and though this can be rather expensive and is not as straightforward as you might think, it is a necessary part of figuring out the lumens of a light. Since lux is not the same as lumens you have to be able to convert the measured lux into lumens. In order to do this you have to have a light that you know the lumens of.
First measure the lux of the light that you already know, making sure that you get the meter to read zero before you turn the light on. You should wait to measure the light for a minute or two because lights tend to be brightest when they are first turned on but then level out. Write this number down and then take this number and the number of lumens you know the light to have.
Now divide the number of lumens by the number of measured lux and keep this number. The next step is to measure the lux of the bike light that you want to know the lumens to, waiting again for a minute or two after you turn it on for the light to level out. Take this number and multiply it to the number that you got from the division you did earlier. This number is the actual lumens of the bike light.
It is likely enough that you will have a hard time getting an accurate reading due to other lights interfering with the sensor even in what might seem like a perfectly dark room. To get around this problem people have invented all sorts of ways to block out all of the light except what comes from the light you are trying to measure the lumens of.
The first one of these is sometimes referred to as a lumen tube. To make a lumen tube the first step is to take three PVC elbow of the same diameter and attach them together so that two of them form a U that lies flat on the table and the third elbow attaches to the end of one of these and points up.
Take an end cap and put it on the other end of the U after cutting out a piece barely big enough for the lux meter to fit snuggly into. Use some duct tape to seal it off and make sure that no light escapes past the lux meter. Inside the end that is pointing up you will need to place a piece of glass that just fits inside the wide connecting section without going further down. This should be glass that does not reflect back any light.
Turn the light on and place it pointing down on top of the glass so that it is perfectly flush. Next cover the area all around the light with foam and cover it with a cloth to make sure that no light escapes from around it. Once this has been done you will be able to get an accurate reading with the lux meter on the other end and the rest of the math stays the same.
Another option is to either buy an integrating sphere or to make one yourself if you have what it takes to do so. There are a number of ways to do this but the most common two involve either a Styrofoam ball and/or paper mache. The basic principles are the same for both, and in either case you will want the ball to be at least 1’ across in diameter.
For the paper mache integrating sphere start by wrapping a rubber or a Styrofoam ball with plastic so that your work won’t stick to it. Then on top of that start adding layers and layers of newspaper that is glued together with a mix of ½ water and ½ glue one layer at a time until it feels solid. Once this is done you can cut your paper mache in half all the way around the circle so that you can take the ball out of the inside.
Paint the inside of your shell with several coats of a white matte paint and cut out two holes – one that is just the right size for the lux sensor and the other one which will be just the right size for your light to shine in – each at a 90 degree angle from the other. Next make a baffle to shade the sensor hole and prevent the light from shining directly on it. Seal the two halves of the shell back together again and it is ready for use!
Although it isn’t nearly as accurate, it is possible to get a rough idea of the lumens of a light by using a high quality camera instead of having to use a lux meter at all. For this way you will need a room that starts off being perfectly dark with a white sheet on one wall and the light held stationary three feet away from the sheet.
Set the ASA of the camera to obtain readings on the shutter speed and aperture. Then look at the light through the camera and use the readings you see in order to get an EV number – Exposure Value number. This number can be taken and converted into lux by an EV to lux chart. Like with the lux meter you will need to do this first on a light you know the lumen to and you will use that same part of the process in order to convert the lux into lumen.
What Is “Burn Time” And How Can It Affect The Lumens
The second most important thing to think about, next to the lumens, is how long the light will last for which is also known as its “burn time”. Some lights actually have different burn times that they will last for based on their settings and how bright they shine. For example, a light with a bright and a dim setting will last longer if set to dim.
Another way that the lumens can be affected by the burn time is that some lights will get dimmer when their batteries start to run low. Another option that can happen is that they will start to flash or blink when they get low. While there are pros and cons to either one, it is good to keep track of the time no matter what so that you are not caught off guard.
It is always import to know the burn time so that you know how long you can safely ride for at night, so for your first night ride choose a route that you know will take you less than the burn time of your lights. It is also important to always bring a backup light in case you get a flat or have some other unexpected delay in order to make sure that you don’t lose light and end up trying to finish the trail in the dark.
Since the burn time and the lumens are related to each other, it is worth taking into consideration when choosing your lights. For example, it might be worth considering getting a brighter light than what you want or need that has a lower setting that is in the range you are looking for. This way you would be more likely to have a longer run time and could take your time on the trail.
Why To Have A Light On Your Bike During The Day And The Proper Lumens
You possibly know that it is required by law in most places to have adequate lighting if you are going to be biking on public streets after dark. This is for both your own safety and for the safety of those who will be driving on the roads with you and helps them be aware that you are there.
For these same reasons it can also be a really good idea to have lights on your bike even during the day. With so much for a driver to look at it can be hard for them to spot a person on a bicycle since you will not stand out as much to them compared to a big vehicle. In fact, you are even less visible to a driver than a motorcyclist is.
In some states people who ride motorcycles are required by law to keep their lights on during the day for this reason, so it only makes sense that bicyclists should do so too. While this won’t help you see the road any better it will help drivers and other people see you better and that is a huge part of avoiding accidents.
The most common cause of vehicle/bicycle accidents is caused because the driver didn’t see the bike until it was too late. Most of the accidents happened in the daytime, for the most part at turning places, T-junctions, or roundabouts. Dawn and dusk are particularly dangerous times as well, even though it might be light enough to see just fine.
While wearing reflective clothing or other such things are all well and good, these only work if a light is being pointed almost directly at you. Let’s face it, if a headlight of a moving car is pointed directly at you then it is quite possibly too late even if they do see you at that point. This is why having a light on your bike even during the day is so important.
For the best effect when riding during the day, have a light that has a strobe setting. Flashing lights catch even more attention than a simple steady stream of light, particularly if it is a bright sunny day. Something around 500 lumens is usually quite sufficient for this since it is bright enough to still be seen in the daytime but not too bright so as to blind anyone like a higher lumen output would.
Another option is to get a bright bike spoke light that is preferably red or some other color that will stand out. These can have a very low lumen and still be seen and will also be helpful to make sure that you are seen at night.